Things are really popping at BESIG, the IATEFL special interest group for Business English.
Wiki: http://ibow.pbworks.com/w/page/31583454/FrontPage
Twitter: http://twitter.com/#!/iatefl_besig
YouTube: http://www.youtube.com/user/IATEFLBESIG
Ning: http://iatefl-besig.ning.com/
For more links, see the Community Page on the BESIG website: http://www.besig.org/community/index.htm
Monday, 22 November 2010
Wednesday, 17 November 2010
Invitation: Come join me in this Bitstrip comic strip
I presented Bitstrips as part of the workshop series last summer, but thought I'd just post, step-by-step, how to make one.
Step 1: Join the Bitstrips site and browse it.
Step 2: Create a character and make it look a little like yourself.
Step 3: Create a comic strip with yourself and some of other characters featured in the "library".
Here's a screencast with Jing that shows you how to handle the controls.
And now ... roll the drums...
Step 4: Engage in social networking through Bitstrips: Add a friend's character to your strip. Or copy a friend's cartoon and add yourself to it, and then let them know!
Short URL: http://bitstrips.com/r/G30WL.
I've set the editing on this strip so that friends can edit it. So come and friend me, copy my strip and put yourself in the last frame :-) Please leave a link.
I've never done this before, so I have no idea whether it will work. Don't be shy :-)
Do any of you already have Bitstrips accounts/ characters? Just let me know.
PS: My favorite review of Bitstrips.
Tuesday, 16 November 2010
Voki
This is a Voki that I typed text into, and which turned my text to (robotic) speech. Create your own at http://www.voki.com/, and see what it does with the text you type in.
Then, below, I've made a second one using a recording of my own voice. You can either record directly into Voki, or create an mp3 using Audacity or (as I did) GarageBand on a Mac.
Caveat: Voki uses Flash, which is not installed on all computers and sometimes causes trouble.

iSpeech Player

The simple text-to-speech app iSpeech Player Code lets you embed a player on a regular blog, but the embed code doesn't work on Ning or Posterous. Instead, you need to download the file as an mp3 and upload it to the site.
The app lets you share a link on any of the sites on the left.
For an excellent overview of text to speech spps, see Özge Karaoglu's blogpost.
Saturday, 17 July 2010
List of links to tools and websites - ELTAS Tech Tools Day
General:
ELTAS Sandbox http://eltas-sandbox.ning.com
internet terms http://www.techterms.com/internet.php
Carl Dowse's list
http://www.wiziq.com/
http://www.dimdim.com/
http://vyew.com/site/
http://www.elluminate.com/
http://www.adobe.com/products/acrobatconnectpro/
Gavin Dudeney’s list
http://www.onestopenglish.com/section.asp?theme=mag&docid=145587
http://www.xtec.cat/cirel/02/webquests/english/2index2.html
http://www.dudeney.com/WebquestsReading.pdf
http://www.mapacourse.com/webquestproject/WebQuestQuiz/webquest_quiz.htm
http://www.educationworld.com/a_curr/curr218.shtml
http://www.theconsultants-e.com/webquests/index.asp
http://webquest.org/search/index.php
http://questgarden.com/search/
http://www.teach-nology.com/web_tools/web_quest/
http://www.aula21.net/Wqfacil/webeng.htm
https://www.teacherweb.com/tweb/twquest.aspx
Anne Hodgson's list
Google image search http://images.google.com/advanced_image_search?hl=en
Tag Galaxy http://taggalaxy.de/
Earth Album http://www.earthalbum.com/
flickr http://www.flickr.com/
TED http://www.ted.com/
YouTube http://www.youtube.com/
Vimeo http://vimeo.com/
Scribd http://www.scribd.com/
Tuxpi http://www.tuxpi.com/
BeFunky http://www.befunky.com/
Wordle http://www.wordle.net/
Tagul http://tagul.com/
Tagxedo http://www.tagxedo.com/
VocabGrabber http://www.visualthesaurus.com/vocabgrabber/
Google Docs Forms http://docs.google.com/
SlideShare http://www.slideshare.net/
280 Slides http://280slides.com/
Prezi http://prezi.com/
Dvolver http://www.dvolver.com/live/home.html
Bitstrips http://www.bitstrips.com/landing
Make beliefs comix http://www.makebeliefscomix.com/
X-tranormal http://www.xtranormal.com/
Animoto http://animoto.com/
Wallwisher http://www.wallwisher.com/
Mike Hogan's list:
Johnny Lee TED 2008: http://www.ted.com/talks/lang/eng/johnny_lee_demos_wii_remote_hacks.html
Johnny Lee’s webpage: http://johnnylee.net/projects/wii/
Smoothboard FAQ: http://www.smoothboard.net/faq
Smoothboard Wiki: http://www.boonjin.com/smoothboard/index.php?title=Main_Page
Infrared pen: http://shop.irpensonline.com/
Smoothboard: http://www.smoothboard.net/
Dabbleboard tour: http://www.dabbleboard.com/tour
Lesson plans using videos in the ELT classroom: http://www.teflclips.com
Free tools and resources for use with an interactive whiteboard:
http://www.triptico.co.uk, http://www.triptico.co.uk/resources/word_magnets/WordMagnets.html
Templates for teacher or student generated review games: http://its.leesummit.k12.mo.us/gameresources.htm
Making guesses/assumptions with students http://classtools.net/education-games-php/lights_out/
Heike Philp's list:
Virtual Round Table Conference http://virtual-round-table.ning.com/
CErtified Live Online Teachers, www.lancelot.at
Learning live Online, www.avalonlearning.eu
Petra Pointner
www.twitter.com
Byron Russell
www.english360.com
Karenne Sylvester's list:
Prezi (presentation)*
http://prezi.com/b4fdzxgbmx6p/blogging-chatting-discussions-online/
Prezi (student version)
http://prezi.com/929xhfxygtqe/why-do-we-write-student-exercise/
Animoto video http://animoto.com/play/h5Xz2Tmw0NRcIoq7veirhA?from=nc&utm_nooverride=1
Google Docs http://docs.google.com/
Delicious http://delicious.com/KalinagoEnglish
Shelly Terrell's list
Presentation Wiki with all the tools, http://technology4kids.pbworks.com/ELTAS
Leave an audio response on the Voxopop thread, http://www.voxopop.com/group/6b4aaf44-4a46-437b-9281-d692510f193d
Register on Voxopop, http://www.voxopop.com
Register on Vocaroo, http://vocaroo.com/newaccount.php
Voicethread http://voicethread.com/
Woki http://www.voki.com/
Glogster http://www.glogster.com/
Audacity http://audacity.sourceforge.net/
Apple iLife Garageband http://www.apple.com/ilife/garageband/
Fotobabble http://www.fotobabble.com/
Andi White
A great website with videos that will walk you through web tools step by step:
teachertrainingvideos.com
Xtra: Barbara Sakamoto's Special PLN (Personal Learning Network) Quiz
What you can learn from my PLN (Teaching Village) http://bit.ly/a9cpYj
internet terms http://www.techterms.com/internet.php
Carl Dowse's list
http://www.wiziq.com/
http://www.dimdim.com/
http://vyew.com/site/
http://www.elluminate.com/
http://www.adobe.com/products/acrobatconnectpro/
Gavin Dudeney’s list
http://www.onestopenglish.com/section.asp?theme=mag&docid=145587
http://www.xtec.cat/cirel/02/webquests/english/2index2.html
http://www.dudeney.com/WebquestsReading.pdf
http://www.mapacourse.com/webquestproject/WebQuestQuiz/webquest_quiz.htm
http://www.educationworld.com/a_curr/curr218.shtml
http://www.theconsultants-e.com/webquests/index.asp
http://webquest.org/search/index.php
http://questgarden.com/search/
http://www.teach-nology.com/web_tools/web_quest/
http://www.aula21.net/Wqfacil/webeng.htm
https://www.teacherweb.com/tweb/twquest.aspx
Anne Hodgson's list
Google image search http://images.google.com/advanced_image_search?hl=en
Tag Galaxy http://taggalaxy.de/
Earth Album http://www.earthalbum.com/
flickr http://www.flickr.com/
TED http://www.ted.com/
YouTube http://www.youtube.com/
Vimeo http://vimeo.com/
Scribd http://www.scribd.com/
Tuxpi http://www.tuxpi.com/
BeFunky http://www.befunky.com/
Wordle http://www.wordle.net/
Tagul http://tagul.com/
Tagxedo http://www.tagxedo.com/
VocabGrabber http://www.visualthesaurus.com/vocabgrabber/
Google Docs Forms http://docs.google.com/
SlideShare http://www.slideshare.net/
280 Slides http://280slides.com/
Prezi http://prezi.com/
Dvolver http://www.dvolver.com/live/home.html
Bitstrips http://www.bitstrips.com/landing
Make beliefs comix http://www.makebeliefscomix.com/
X-tranormal http://www.xtranormal.com/
Animoto http://animoto.com/
Wallwisher http://www.wallwisher.com/
Mike Hogan's list:
Johnny Lee TED 2008: http://www.ted.com/talks/lang/eng/johnny_lee_demos_wii_remote_hacks.html
Johnny Lee’s webpage: http://johnnylee.net/projects/wii/
Smoothboard FAQ: http://www.smoothboard.net/faq
Smoothboard Wiki: http://www.boonjin.com/smoothboard/index.php?title=Main_Page
Infrared pen: http://shop.irpensonline.com/
Smoothboard: http://www.smoothboard.net/
Dabbleboard tour: http://www.dabbleboard.com/tour
Lesson plans using videos in the ELT classroom: http://www.teflclips.com
Free tools and resources for use with an interactive whiteboard:
http://www.triptico.co.uk, http://www.triptico.co.uk/resources/word_magnets/WordMagnets.html
Templates for teacher or student generated review games: http://its.leesummit.k12.mo.us/gameresources.htm
Making guesses/assumptions with students http://classtools.net/education-games-php/lights_out/
Heike Philp's list:
Virtual Round Table Conference http://virtual-round-table.ning.com/
CErtified Live Online Teachers, www.lancelot.at
Learning live Online, www.avalonlearning.eu
Petra Pointner
www.twitter.com
Byron Russell
www.english360.com
Karenne Sylvester's list:
Prezi (presentation)*
http://prezi.com/b4fdzxgbmx6p/blogging-chatting-discussions-online/
Prezi (student version)
http://prezi.com/929xhfxygtqe/why-do-we-write-student-exercise/
Animoto video http://animoto.com/play/h5Xz2Tmw0NRcIoq7veirhA?from=nc&utm_nooverride=1
Google Docs http://docs.google.com/
Delicious http://delicious.com/KalinagoEnglish
Shelly Terrell's list
Presentation Wiki with all the tools, http://technology4kids.pbworks.com/ELTAS
Leave an audio response on the Voxopop thread, http://www.voxopop.com/group/6b4aaf44-4a46-437b-9281-d692510f193d
Register on Voxopop, http://www.voxopop.com
Register on Vocaroo, http://vocaroo.com/newaccount.php
Voicethread http://voicethread.com/
Woki http://www.voki.com/
Glogster http://www.glogster.com/
Audacity http://audacity.sourceforge.net/
Apple iLife Garageband http://www.apple.com/ilife/garageband/
Fotobabble http://www.fotobabble.com/
Andi White
A great website with videos that will walk you through web tools step by step:
teachertrainingvideos.com
Xtra: Barbara Sakamoto's Special PLN (Personal Learning Network) Quiz
Friday, 16 July 2010
What's your favorite learning environment?
Where's your collaborative learning environment these days? One thing is for sure: It's likely not all in one place! One of my one-to-one students has a Ning and a Posterous blog. My Moodle and home blog are my mainstay, but I'm not teaching anyone there are the moment. A test I wrote for another Moodle course is up and running very well. Then there's a company Ning. I'm learning myself on Twitter, and using all sorts of sites like GoogleReader and Delicious to organize my own learning.
Of all the all-in-one packages, I think Moodle is still the best solution for school and college courses. It provides students activities for higher order learning, like forum, database, glossary and wiki. It's great for blended learning. Much of it is presenting and collecting/ organizing student work (if you need that it's the only choice!), but you can also assign more productive roles to your students.
I very much like the integrated tests for self-assessment. This is a type of learning that may be underestimated. I've been building tests for Spotlight now for two and a half years, so I know a little more about tests than back when I was using Moodle only for collaborative learning. Students like doing interactive quizzes as long as they're short and sweet to keep on track. Moodle includes the most extensive feedback options I have seen anywhere. This is what feedback in a Moodle test looks like (just click these to view them large):
I'm a fan of the test-teach-test approach to learning some basics, and Moodle has all the tools you need for that. Ning and the various tools you could embed in a Ning don't come close. But creating good tests in Moodle takes much longer than you think.
Still, I'm currently going with Ning for company courses, and be it simply to share experience with more trainers, but I'm wondering whether I should switch back. Or look elsewhere.
What are you opting for these days, and why?
Of all the all-in-one packages, I think Moodle is still the best solution for school and college courses. It provides students activities for higher order learning, like forum, database, glossary and wiki. It's great for blended learning. Much of it is presenting and collecting/ organizing student work (if you need that it's the only choice!), but you can also assign more productive roles to your students.
I very much like the integrated tests for self-assessment. This is a type of learning that may be underestimated. I've been building tests for Spotlight now for two and a half years, so I know a little more about tests than back when I was using Moodle only for collaborative learning. Students like doing interactive quizzes as long as they're short and sweet to keep on track. Moodle includes the most extensive feedback options I have seen anywhere. This is what feedback in a Moodle test looks like (just click these to view them large):


I'm a fan of the test-teach-test approach to learning some basics, and Moodle has all the tools you need for that. Ning and the various tools you could embed in a Ning don't come close. But creating good tests in Moodle takes much longer than you think.
Still, I'm currently going with Ning for company courses, and be it simply to share experience with more trainers, but I'm wondering whether I should switch back. Or look elsewhere.
What are you opting for these days, and why?
Take a snapshot of your screen
Creating online snapshots is getting more important as we work online and want to save images of the processes to document or explain things. So: What do you use to make screenshots?
With Microsoft Windows, you press the Print Screen button.
I use Mac, and my favorite tool is the incredibly versatile Skitch that lets you annotate and resize pictures (tutorial). The most amazing bit: You simply drag and drop an image into an email. That has come in handy. I've also used it to prepare several of the images on this blog.
I often use it to take snapshots of Wordle and Tagxedo wordclouds. They're great to project on the wall for


In Tagxedo, a "shapely" app, every word in the cloud is a hyperlink. The sophisticated software driving all of that means it doesn't work on some sites, like the Drupal site Spotlight runs on. If you don't really need all those hyperlinks but like the pretty image, you can take a screenshot and just link the image you have captured back to the original page (add the image, then in the rich text editor highlight the picture, click on the link symbol, copy in the original URL):

With Microsoft Windows, you press the Print Screen button.
I use Mac, and my favorite tool is the incredibly versatile Skitch that lets you annotate and resize pictures (tutorial). The most amazing bit: You simply drag and drop an image into an email. That has come in handy. I've also used it to prepare several of the images on this blog.
I often use it to take snapshots of Wordle and Tagxedo wordclouds. They're great to project on the wall for
- predicting
- remembering
- highlighting and developing
- spinning off new discussions
- spelling
- leading into vocabulary work (collocations, Visual Thessaurus)

In Tagxedo, a "shapely" app, every word in the cloud is a hyperlink. The sophisticated software driving all of that means it doesn't work on some sites, like the Drupal site Spotlight runs on. If you don't really need all those hyperlinks but like the pretty image, you can take a screenshot and just link the image you have captured back to the original page (add the image, then in the rich text editor highlight the picture, click on the link symbol, copy in the original URL):
Handouts ELTAS Tech Tools Day 2010
ELTAS Tech Tools 2010 Level 1
ELTAS Tech Tools 2010 Level 2
My two handouts are embedded here using Scribd. The first part of the tutorial below shows you how it works:
ELTAS Tech Tools 2010 Level 2
My two handouts are embedded here using Scribd. The first part of the tutorial below shows you how it works:
Games to play in your forum or blog
This is another ELTAS Tech Tools Day task.
Pre-task thinking:
Text-based games
Any kind of collaborative or prompted writing can be a game as soon as you set rules limiting what students can do, getting their creative juices flowing. They are developing something together, yet watching the others, which all by itself introduced a competitive element. You can set time constraints to raise adrenaline levels and create parallel tasks to increase the sense of competition.
You might want to link to Oxford collocations in your Ning or blog and have students refer to them when playing text-based games to keep the language juices flowing.
Picture-based games
Post a puzzling picture as a discussion and have everyone guess what it is. I really like the picture puzzles on Pixelio.de. Register and then just type in "Bildrätsel" into the search box there for free downloadable pictures. The photographers generally include a picture "solution" that you can share when comments start to run dry. Pairs include these:


Interactive games for adults: Fun, but not collaborative!
You can create your own games, and the range is virtually endless. But where is the line between a game and an exercise? Many ready games are Flash-based, which has to be installed on the computers you are using. You'll find interactive language games at Spotlight, designed by Macmillan.
Hat tip to Markus Brendel of Der Englisch Blog: Markus embeds in his blog is Sheepman, a German-English idiom translation game that has sheep biting the dust. The activities on Nik (Peachey)'s Daily English Activities feel like games. It's a big world of games out there (let's talk about it another day).
BUT all of these games can also be played alone. You can beam them up on a whiteboard, or use a projector and have someone type what everyone says.
But in a forum, you're playing together. Collaborating. Even if you're not in the same room.
Task:
Pre-task thinking:
- What kinds of games do you play with adult classes?
- Which games make them actually apply their language skills?
Text-based games
Any kind of collaborative or prompted writing can be a game as soon as you set rules limiting what students can do, getting their creative juices flowing. They are developing something together, yet watching the others, which all by itself introduced a competitive element. You can set time constraints to raise adrenaline levels and create parallel tasks to increase the sense of competition.
- Write a story simply by extending a sentence by a word. Rule: you're not allowed to delete what someone else has written! Here's a sample: Expanding Alice. Each person updating the story copies and pastes the last update into the comments and adds words.
- Change a story by changing individual words (sample: Altering Alice).
You might want to link to Oxford collocations in your Ning or blog and have students refer to them when playing text-based games to keep the language juices flowing.
Picture-based games
Post a puzzling picture as a discussion and have everyone guess what it is. I really like the picture puzzles on Pixelio.de. Register and then just type in "Bildrätsel" into the search box there for free downloadable pictures. The photographers generally include a picture "solution" that you can share when comments start to run dry. Pairs include these:


Interactive games for adults: Fun, but not collaborative!
You can create your own games, and the range is virtually endless. But where is the line between a game and an exercise? Many ready games are Flash-based, which has to be installed on the computers you are using. You'll find interactive language games at Spotlight, designed by Macmillan.
Hat tip to Markus Brendel of Der Englisch Blog: Markus embeds in his blog is Sheepman, a German-English idiom translation game that has sheep biting the dust. The activities on Nik (Peachey)'s Daily English Activities feel like games. It's a big world of games out there (let's talk about it another day).
BUT all of these games can also be played alone. You can beam them up on a whiteboard, or use a projector and have someone type what everyone says.
But in a forum, you're playing together. Collaborating. Even if you're not in the same room.
Task:
- Think of a forum game to play with a class of yours.
- Write the introductory text.
- Post as a Ning discussion.
- Invite others to join.
Thursday, 15 July 2010
Comix starring you: Bitstrips
This is another ELTAS Tech Tools Day task.
Pre-task thinking:
Watch:
Bitstrips is a social networking site where you can connect with other Bitstrip makers. The site lets you
This is an old one:
Learning the ropes is clearly easier for children. But this is fail-safe. Make your avatar, make a solo-strip, then try including other characters in a new strip, and invite a friend to join. Even if you don't get all of it, it'll work. Go! With a class, just making the avatar will give you great language. The magic is in the process of creation - not necessarily in the comix produced! Caution: It's a time killer and quite addictive. Here's an idea of what the program does:
Very chatty: ubergeek Chris Pirillio says he's been waiting all his life for this type of software and explains how to invite a friend, creating his or her character...
Pre-task thinking:
- We live in the age of me (or "mi", to quote Beaker.) Agree or disagree?
- Does self-portrayal or self-promotion play a role in your teaching/ your students' learning styles?
- Brainstorm: What sort of stories could star your students?
Watch:
Bitstrips is a social networking site where you can connect with other Bitstrip makers. The site lets you
- create characters of all kinds.
- create a character that looks like you – your avatar.
- give your avatar a role in a comic
- find and add characters others have made to create dialogues
- create strips of various lengths
This is an old one:
Learning the ropes is clearly easier for children. But this is fail-safe. Make your avatar, make a solo-strip, then try including other characters in a new strip, and invite a friend to join. Even if you don't get all of it, it'll work. Go! With a class, just making the avatar will give you great language. The magic is in the process of creation - not necessarily in the comix produced! Caution: It's a time killer and quite addictive. Here's an idea of what the program does:
Very chatty: ubergeek Chris Pirillio says he's been waiting all his life for this type of software and explains how to invite a friend, creating his or her character...
Make your own comix with Make Beliefs Comix
This is another ELTAS Tech Tools Day task.
Pre-task thinking:
Make Beliefs Comix
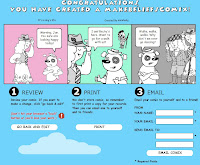
Make Beliefs Comix is an easy tool providing cute characters for "children of all ages".
The interface is self-expanatory.
You can create 2-4 frames and add characters, expressions, change position, add speech and thought bubbles... and when you're done you can print out (or print as a pdf) and even send as an email. Careful: Never go back using the back arrow, as you lose all of your work. I did!
Task:
Make a comic with Make Beliefs Comix + email it to yourself and your friends.
Pre-task thinking:
- What kinds of exchange fit into a 3-4 frame comix format?
- Would you prefer to have students make comix alone, in pairs or as a group?
Make Beliefs Comix
Make Beliefs Comix is an easy tool providing cute characters for "children of all ages".
The interface is self-expanatory.
You can create 2-4 frames and add characters, expressions, change position, add speech and thought bubbles... and when you're done you can print out (or print as a pdf) and even send as an email. Careful: Never go back using the back arrow, as you lose all of your work. I did!

Task:
Make a comic with Make Beliefs Comix + email it to yourself and your friends.
Storytelling: Tuxpi to edit a photo
This is another ELTAS Tech Tools Day task.
Pre-task thinking:
Take that wonderful Blackpool staple, Yvette, the Headless Woman.
Task 1:
Give three pictures to three different parties and ask them, "Say, who is Yvette?"


Image protected. Find other pictures to use. Copyright of the National Fairground Archive, University of Sheffield 2007.

Task 2:
Pre-task thinking:
- Every photo tells a story, they say. But doesn't it in fact usually tell several? It's all a matter of perspective.
- So give your students two or more separate storytelling prompts made from one photo, using simple photo editing techniques.
Take that wonderful Blackpool staple, Yvette, the Headless Woman.
Task 1:
Give three pictures to three different parties and ask them, "Say, who is Yvette?"


Image protected. Find other pictures to use. Copyright of the National Fairground Archive, University of Sheffield 2007.

Task 2:
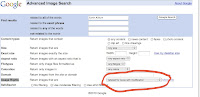
- Find a picture using Google Advanced Image Search (select "labeled for reuse with modification")
- Edit it in Tuxpi. Download it.
- Open a new discussion in Ning.
- Upload/embed the picture. Formulate a task.
- Respond to answers.
- Respond to someone else's picture task.

Storytelling: A slideshow with Animoto
This is another ELTAS Tech Tools Day task.
Pre-task thinking:
Positive: This tool is free and easy to use, so good for students, especially for those who keep photos online.
Negative: You can't change the sequence of the pictures, or map the audio exactly to the individual frames.
The following Animoto slideshow was made using
Share pictures as a slideshow and either
Pre-task thinking:
- How do you use photographs for storytelling?
Positive: This tool is free and easy to use, so good for students, especially for those who keep photos online.
Negative: You can't change the sequence of the pictures, or map the audio exactly to the individual frames.
The following Animoto slideshow was made using
- photos I uploaded from my phone to Flickr and made into an album
- an mp3 audio file I made recording myself and using Garageband (part of Apple) including a jingle. You can use Audacity (great freeware) instead to create mp3s.
Create your own video slideshow at animoto.com
Task:Share pictures as a slideshow and either
- add a short audio file in which you explain them
- write a text about them to post along with the slideshow
- Select or create an album on Flickr with pictures from an event (up to 12 pictures)
OR find up to 12 pictures online through Google Images. (Use "advanced search" to assure that the Usage Rights state that they are "labeled for reuse".) - Create a 30 second mp3 using Audacity
OR write a paragraph to go with the pictures. - Go to http://animoto.com
- For "add pictures", connect to your Flickr album and select it OR select pictures online individually OR upload them from your computer.
- Add a title and description to your first slide.
- For "music", either upload your mp3 recording OR add a piece of music Animoto offers
- Let Animoto complete the mashup.
- Embed on your blog or Ning (along with any text.)
Wallwisher
This is another ELTAS Tech Tools Day task.
Pre-task thinking:
Task 1:
First, use this Wallwisher wall to post something you'd really love to try out. If you've seen an example you want to share, link to it in the bottom part of your sticky. This is our wish list ;). No need to register, just add your name so it's not anonymous. (If you're registered your name shows automatically)
The link: TechTools4AuntieWeb Wallwisher wall
Task 2:
Make your own wall.
What will it be about?
In her tutorial below, Ana Maria Menezes (Twitter, Life Feast blog) teaches her students not only how to make a wall, but also how to publish it in a blog. A great way to get students creating tasks for their fellow students! For student blogs she recommends the ultra-simple http://www.posterous.com, and so do I.
Pre-task thinking:
- What are your first steps online with a class?
- How can you engage a group to use the web to communicate with each other?
- How can you make what people in your group say visible at a glance?
- How can you collect and save ideas/links in one place when your group is connected by "nothing" but the Internet?
Task 1:
First, use this Wallwisher wall to post something you'd really love to try out. If you've seen an example you want to share, link to it in the bottom part of your sticky. This is our wish list ;). No need to register, just add your name so it's not anonymous. (If you're registered your name shows automatically)
The link: TechTools4AuntieWeb Wallwisher wall
Task 2:
Make your own wall.
What will it be about?
- Collecting tips on places to go to keep cool?
- Best songs out this year?
- Favorite cities?
- Go to http://www.wallwisher.com
- Register (name, email)
- Create a wall by selecting a title (at least 6 characters) creating a URL for your wall. Tip: Since the title will be your URL, it has to be unique. Many popular titles are already taken. Use numbers (like 2 and 4) in your title
- Leave the default setting: everyone can post + view.
- Select an image and background.
- Click "done" to submit.
- Post a sticky with text and optional link. You can edit you sticky.
- Link to this page (URL) in your blog or Ning and invite stickies
- OR, under "Do more", click "embed" an image of the wall and copy this code to your blog or Ning.
In her tutorial below, Ana Maria Menezes (Twitter, Life Feast blog) teaches her students not only how to make a wall, but also how to publish it in a blog. A great way to get students creating tasks for their fellow students! For student blogs she recommends the ultra-simple http://www.posterous.com, and so do I.
Wednesday, 14 July 2010
Xtranormal to script a short animated film
This is another ELTAS Tech Tools Day task.
Pre-task thinking:
Creating a movie and saving it as work in progress is free. That's all you need to have your students view yours and work on making one themselves.
BUT to publish an Xtranormal video, whether your own or your student's work, on a website to show it to others, costs $$. You have to buy points. How many does not become clear. Don't miss Darren Elliott's excellent rant about this new aspect of working with online tools.
Working with what we have:
 In my video project, an assstant is being interviewed for a company magazine. As work in progress, I can only show it to you if I am logged in. We could work on it collectively on one computer, with one carrying out the edits the others suggest. For you to be able to access and simply view the video on your own, it would have to be published.
How to edit:
I've made a SHORT VIDEO of my editing this project inside Xtranormal.
Task 1:
We could edit my project together. (Link for me.)
Task 2:
See what other teachers are doing and comment on their ideas:
Create a short dialogue using Xtranormal. Make it as natural as possible.
Pre-task thinking:
- What do your students get out of listening to and writing out dialogues?
- How is students having puppets or cartoon characters speak the dialogue different from speaking it themselves?
- How important is it to your students to present the fruits of their learning to others?
- Do you/ How do you correct dialogues?
- review the language of natural conversation
- catch typical mistakes
- practice functional language
- become aware of body language and sounds in conversation
- Fun and motivation! Varieté et surprise! Coolness factor!
Creating a movie and saving it as work in progress is free. That's all you need to have your students view yours and work on making one themselves.
BUT to publish an Xtranormal video, whether your own or your student's work, on a website to show it to others, costs $$. You have to buy points. How many does not become clear. Don't miss Darren Elliott's excellent rant about this new aspect of working with online tools.
Working with what we have:
 In my video project, an assstant is being interviewed for a company magazine. As work in progress, I can only show it to you if I am logged in. We could work on it collectively on one computer, with one carrying out the edits the others suggest. For you to be able to access and simply view the video on your own, it would have to be published.
How to edit:
I've made a SHORT VIDEO of my editing this project inside Xtranormal.
Task 1:
We could edit my project together. (Link for me.)
Task 2:
See what other teachers are doing and comment on their ideas:
- Ana Maria Mendez has a lesson plan for phrasal verbs using Xtranormal.
- ESP writer Jeremy Day has used Xtranormal to present a script and do language work, and shows how (and how not to) in his blog, Specific English.
- Kathy Niebuhr has guestposted on Shelly Terrell's Teacher Reboot Camp blog about how she uses it in elementary school, including a video announcement.
- Note: The Xtranormal YouTube channel contains highly entertaining, completely inappropriate material. The Xtranormal site itself has more suitable videos.
- Please add any ideas and blogposts you know of in the comments below.
Create a short dialogue using Xtranormal. Make it as natural as possible.
- Go to http://www.xtranormal.com and sign up.
- Use a showpack with two characters to make a text-to-movie video.
- adapt the characters in the "Design the scene" area at the bottom of the page. Note that you can choose from a wide range of voices/ nationalities.
- Write the script and "direct the action" by dragging in features and selecting options.
- Preview and save.
- Sorry: We can't share unless you buy credit. :(
Link + embed media to start a discussion
This is another ELTAS Tech Tools Day task.
Pre-task thinking:
The tech basics:
Embed media when you can, but link...
Work with two tabs open:
How to link to anything:
Task 1: Start a discussion using a picture
Here's a SHORT VIDEO on how to create links and embed media.
(Thank you to Jo Westcombe for the article used in the video!)
Task 2: Start a discussion using a video
Pre-task thinking:
- What kind of media do you want to share with your students?
- How do you think they will to respond to media?
- How can you encourage them to respond?
The tech basics:
- Online you can create a link from your site to any webpage containing the content you want your students to see.
- You can only embed a file so it looks like an element of your webpage from sites that are explictly set up as filesharing sites for documents, games, pictures, presentations or videos. These sites provide you with the specific embed code.
- videos on YouTube, Vimeo and TED
- pictures on flickr
- use Tag Galaxy to find pictures for your subject on flickr
- create your own gallery on flickr to collect your favorite pictures - documents on Scribd
- presentations on Slideshare
- wordclouds on Wordle
- embed media others have made directly from such sites
- embed media others have embedded on their sites
- create such media yourself, upload them to the filesharing site and then embed them from there on your site
Embed media when you can, but link...
- when you want learners to go to the site where you found them (to introduce them to that environment)
- when the embed code doesn't work on your site (e.g. Google Docs in Ning) - and always check your page when you make other changes to see whether the embed code still works flawlessly
- when the media is in context and you want to refer to that.
- when copyright restrictions apply

Here is a SHORT VIDEO that shows how I use embedding and linking in a class log in Ning.

Work with two tabs open:
- It's easiest to have both your and the other page open at once.
- To open a second tab, press control +T.
How to link to anything:
- Open your page.
- In your second tab, find the page you want to link to.
- Copy (highlight, press Control + C) the URL into your mouse.
- Go to your text, activate "edit" to open the rich text editor
- highlight what will be hypertext.
- Click on the "link" symbol.
- Paste in the code (press Control + V).
- Some rich text editors let you chose between "open in the same page" and "open in a new page". These also let you label your link: the text that shows when you mouseover.
- Save.
- Open your page, click edit and create a line of empty space where the embed should go. Type a space marker, like XXX, to help you find this space again.
- Select HTML mode (not rich text editor).
- Open a second tab (pressing Control + T).
- In the second tab, go the website/ document you want to embed.
- Find the embed code for your document
- Copy (highlight, then press Control + C) the code.
- Go back, find your space marker.
- Paste the code onto your marker (highlight, press Control + V).
- Check the embed code for width. Change the width to 425 for most blogs.
- Save. Preview.
- Only after saving should you make any changes using your rich text editor, e.g. aligning your files or changing the size by dragging the edges.
- Publish.
Task 1: Start a discussion using a picture
- Find a picture using Google Image. Make sure you are allowed to reproduce it (advanced search) Find the URL.
- Open a new discussion in the Forum on the ELTAS Tech Tools Ning.
- Type an introductory sentence, for orientation and directions.
- Below it, use the rich text editor to embed the picture.
- Below that, type in a question.
- Save.
- When responses come in, respond to them.
- Visit at least one other video and respond to the question.
Here's a SHORT VIDEO on how to create links and embed media.
(Thank you to Jo Westcombe for the article used in the video!)
Task 2: Start a discussion using a video
- Find a short video (under 3 minutes) to discuss on YouTube.
- Open a new discussion in the Forum on the ELTAS Tech Tools Ning.
- Type an introductory sentence, for orientation and directions.
- Below it, embed the video.
- Below that, ask a question.
- When responses come in, respond to them.
- Please visit at least one other video and respond to the question.
GoogleDocs in Ning to collect vocabulary
This is another ELTAS Tech Tools Day task.
Pre-task thinking:
What I'm doing:
One of my company courses now has a Ning. We use this collaborative learning environment primarily to get organized, as the participants have rather demanding jobs that make them have to miss quite a few lessons. The Ning lets them check things neatly in our course log. I can embed any media we used, so that means fewer copies of handouts to pass on to those who didn't show up. We also organize our extra-curricular events there.
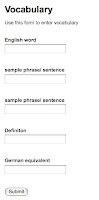 One thing they've asked me for over the years is a vocabulary list that they could fill in. We've used handwritten sheets and copied them, but that doesn't work well, especially when they are coming irregularly. So what I've done is to make a Google Docs Form using the questions:
And any user can read (but not edit!) a Google Spreadsheet that has been published as a web page. When new content is added through the form, this web page is updated automatically. On the spreadsheet select the settings: Publish + Automatically republish when changes are made.

Macmillan dictionary
Oxford collocations
Corpus Concordance English
American Corpus
Linguee
Leo
Now they'll just have to start filling it up!
The limits of Google Docs in Ning:
Unfortunately, you can't embed a Google Form or Spreadsheet in Ning the way you can in a blog or in Moodle. This is connected to internal formatting in Ning. Pity! It would be nice to have everything under our Ning URL. Adding a link is only second-best.
Task:
Create a vocabulary list template using Google Doc Form.
Create categories like:
Link to it so we can add vocabulary.
Pre-task thinking:
- Does it make sense to keep a vocabulary list for the entire class?
- Or does each individual have his/her own list that can not be generalized?
- How do you collect vocabulary in your classes?
- Have you tried other systems?
- What are the pros and cons of each?
- How does collecting vocabulary in digital form differ from having it in a notebook?
What I'm doing:
One of my company courses now has a Ning. We use this collaborative learning environment primarily to get organized, as the participants have rather demanding jobs that make them have to miss quite a few lessons. The Ning lets them check things neatly in our course log. I can embed any media we used, so that means fewer copies of handouts to pass on to those who didn't show up. We also organize our extra-curricular events there.
 One thing they've asked me for over the years is a vocabulary list that they could fill in. We've used handwritten sheets and copied them, but that doesn't work well, especially when they are coming irregularly. So what I've done is to make a Google Docs Form using the questions:
- English word
- sample phrase/ sentence
- sample phrase/ sentence
- Definiton
- German equivalent
And any user can read (but not edit!) a Google Spreadsheet that has been published as a web page. When new content is added through the form, this web page is updated automatically. On the spreadsheet select the settings: Publish + Automatically republish when changes are made.

So all I had to do is get my students to sign up for Ning. Then I created a text box in Ning and added two links:
- to the live form to enter new words
- to the output spreadsheet to view our list.
Macmillan dictionary
Oxford collocations
Corpus Concordance English
American Corpus
Linguee
Leo
Now they'll just have to start filling it up!
The limits of Google Docs in Ning:
Unfortunately, you can't embed a Google Form or Spreadsheet in Ning the way you can in a blog or in Moodle. This is connected to internal formatting in Ning. Pity! It would be nice to have everything under our Ning URL. Adding a link is only second-best.
Task:
Create a vocabulary list template using Google Doc Form.
Create categories like:
- word
- sample phrase
- explanation
- translation
Link to it so we can add vocabulary.
Sunday, 11 July 2010
Add a comment to someone's blog
The ELTAS Tech Tools Day includes a workshop for online newbies introducing the basics of online communication. Those first steps can be daunting, and plenty of great teachers are a bit afraid of taking them. Here are a few
Pre-task questions:
Q: Why should I comment on a blogpost? I can send that person an email if I know them and really want to say something. And if I don't know them, isn't commenting just showing off?
A: This is a question of the changing culture in our profession. I look forward to a lively discussion with you!
Q: If I post a comment to a blogpost I have read online, the page looks different and the interface asks me to identify myself in some way, sometimes type in some letters from a visual code (a captcha, right?) or even add my email address. Won't I get lots of spam if I type in my email address?
A: No. Your email address is only published to the blogger and is visible only in the blogger's backend, the admin area. Seeing your email address tells the blogger that your entry is not spam to his or her blog. Since spam is a fact of life, though, you should activate spam filters on your email account(s) anyway.
Q: I wrote a comment, but it didn't show up when I looked at the blog. Why?
A: The first time you comment on a blog, it is put on hold. The blogger has to allow comments by you first. Patience is sometimes needed, as some bloggers do have a life, I've been told.
Q: I want to add a link to my comment. How do I do it?
A: Just copy and paste the link into the interface (include the http:// at the beginning!). Will it show up as a hyperlink?
 Q: Can you just run through the whole process?
A: Yep. Here's a video.
Video made with Jing, a great screen capture tool.
Task:
Add a comment to a blog.... for instance, to this post!
Take the challenge and add a hyperlink to your comment!
For example, can you share a site you like to go to for teaching ideas?
Pre-task questions:
Q: Why should I comment on a blogpost? I can send that person an email if I know them and really want to say something. And if I don't know them, isn't commenting just showing off?
A: This is a question of the changing culture in our profession. I look forward to a lively discussion with you!
Q: If I post a comment to a blogpost I have read online, the page looks different and the interface asks me to identify myself in some way, sometimes type in some letters from a visual code (a captcha, right?) or even add my email address. Won't I get lots of spam if I type in my email address?
A: No. Your email address is only published to the blogger and is visible only in the blogger's backend, the admin area. Seeing your email address tells the blogger that your entry is not spam to his or her blog. Since spam is a fact of life, though, you should activate spam filters on your email account(s) anyway.
Q: I wrote a comment, but it didn't show up when I looked at the blog. Why?
A: The first time you comment on a blog, it is put on hold. The blogger has to allow comments by you first. Patience is sometimes needed, as some bloggers do have a life, I've been told.
Q: I want to add a link to my comment. How do I do it?
A: Just copy and paste the link into the interface (include the http:// at the beginning!). Will it show up as a hyperlink?
- Only if the comments function has a built-in converter from Rich Text (the formatted text) to HTML (the code that runs the websites). Some blogs do, some don't.
- If your link doesn't show up as a hyperlink after you post it, don't worry. Next time, try adding the necessary HTML code to create a hyperlink. Here's a simple HTML table, and your HTML code for hyperlinks is at the bottom on the left:
 Q: Can you just run through the whole process?
A: Yep. Here's a video.
Video made with Jing, a great screen capture tool.
Task:
Add a comment to a blog.... for instance, to this post!
Take the challenge and add a hyperlink to your comment!
For example, can you share a site you like to go to for teaching ideas?
Saturday, 10 July 2010
Self-correcting quizzes with instant feedback
This is another ELTAS Tech Tools Day task
Pre-task thinking:
There are advantages to using Google apps for everything. If your students create a Google email account, all forms and other notifications map beautifully in the e-mails they receive.
So let's say you want to give your student a self-correcting quiz they can see their results in, and want to go with Google Docs Form. Your primary goal then is not to assess, but to give your quiz takers a quick fix for formative self-evaluation and motivation, with at least the minimal feedback whether they got the question right or wrong.
Step by step:
Task:
Pre-task thinking:
There are advantages to using Google apps for everything. If your students create a Google email account, all forms and other notifications map beautifully in the e-mails they receive.
So let's say you want to give your student a self-correcting quiz they can see their results in, and want to go with Google Docs Form. Your primary goal then is not to assess, but to give your quiz takers a quick fix for formative self-evaluation and motivation, with at least the minimal feedback whether they got the question right or wrong.
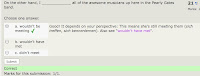
You can use Google Docs Form. I've doctored the assessment test (see last blog entry) to change it into this type of quiz. Try it out!
Feel free to compare the test you've taken with its backend here.
Karenne Sylvester taught me how she creates these tests for a student of hers:
Feel free to compare the test you've taken with its backend here.
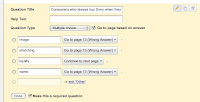
Karenne Sylvester taught me how she creates these tests for a student of hers:
- The questions are one to a page.
- Picking the right answer takes the test taker to the next page.
- Wrong answer? The test taker gets the message "Wrong answer! Please go back and try again."
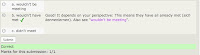
Step by step:
- Create your quiz using Google Docs Form.
- After each question, add a page break. Page titles ="question 1" "question 2" etc.
- Add two page breaks at the end, title = "Wrong Answer" and "Well done!"
- Edit each question individually by activating the "go to page based on answer" box: For the correct answer select "Continue to next page". For all incorrect answers select "go to page X (Wrong Answer)". For the last question select "Well done!" Save everything.

Task:
- Create a self-correcting quiz with feedback using Google Docs Form.
- Please create a link to your document so we can try your quiz out.
Friday, 9 July 2010
An assessment test with Google Docs
This is another task for the ELTAS Tech Tools Day.
Pre-task thinking:
Let's say you want to send clients an assessment test for them to do from home, and all the data should be evaluated instantly, without you having to correct it. You would like to have all of the data neatly in one table, easily available. This could be for a general assessement test that you use again and again.
I've got a very short test on Making appointments on the phone just to show what the front end of such a self-grading test could look like to the client:
When you do it, you'll notice:
It's fantastic for you, though. Have a look behind the scenes at the spreadsheet, and you'll see:
The trick is to set up your quiz and enter the correct answers yourself through the form. Then go into the spreadsheet itself and add those answers as headers, or questions, at the top of new columns. Follow up by entering a simple formula in each of the columns below the answers to allow the correct answers you enter in the spreadsheet to be checked against the answers given by the test takers.
This is the formula in words:
If the student's answer is equal to your answer, then he/she gets X points; otherwise he/she gets 0 points
In our case, I've decided to give each correct answer X=20 points, adding up to a total of 100 for the 5 questions. Look at the formula:
The $ signs before the correct answer field let you avoid changing that particular letter/ numeral in the formula when you drag the formula down the page.
Task:
Pre-task thinking:
Let's say you want to send clients an assessment test for them to do from home, and all the data should be evaluated instantly, without you having to correct it. You would like to have all of the data neatly in one table, easily available. This could be for a general assessement test that you use again and again.
I've got a very short test on Making appointments on the phone just to show what the front end of such a self-grading test could look like to the client:
When you do it, you'll notice:
- you get no feedback!
It's fantastic for you, though. Have a look behind the scenes at the spreadsheet, and you'll see:
- the answers are neatly entered in a spreadsheet with a formula that evaluates the answer and gives points accordingly, which are added up.
- Note that new data that has gone in needs to be formatted simply dragging the formula in each column down over the new data below.
- If you haven't already, please study the Google Docs Form/ Spreadsheet entry on this blog first.
- Then watch this video explaining the self-grading feature.
- Finally come back and study the sample spreadsheet and its formula.
The trick is to set up your quiz and enter the correct answers yourself through the form. Then go into the spreadsheet itself and add those answers as headers, or questions, at the top of new columns. Follow up by entering a simple formula in each of the columns below the answers to allow the correct answers you enter in the spreadsheet to be checked against the answers given by the test takers.
This is the formula in words:
If the student's answer is equal to your answer, then he/she gets X points; otherwise he/she gets 0 points
In our case, I've decided to give each correct answer X=20 points, adding up to a total of 100 for the 5 questions. Look at the formula:
- In H2 you'll see "=if(C2=$H$1,20,0)"
- In H3 you'll see "=if(C3=$H$1,20,0)"
- In I2 you'll see "=if(D2=$I$1,20,0)"
- In I3 you'll see "=if(D3=$I$1,20,0)"
The $ signs before the correct answer field let you avoid changing that particular letter/ numeral in the formula when you drag the formula down the page.
Task:
- Create a short self-grading assessment test.
- Post a link to it so we can take it.
A comprehension quiz using ProProfs Quiz Maker
This is another ELTAS Tech Tools Day task
Pre-task thinking:
So please do her latest quiz. Then come back and create a quiz of your own using the software.
Step by step:
Pre-task thinking:
- Can self-correcting online quizzes motivate learners, and if so, how?
- When would you refer to ones available online?
- When would you want to write one yourself?
- What would your students get out of creating a quiz and posting it for the others?
So please do her latest quiz. Then come back and create a quiz of your own using the software.
Step by step:
- Select a presentation or an article or blogpost online.
- Formulate comprehension questions and possible answers, including one correct one and two or more distractors.
- Register as a user on ProProfs Quiz Maker.
- Go to Create a Quiz and select "Scored Quiz"
- Type a quiz title, add tags and an introduction.
- Type in your questions and add a comment containing a tip (but not the answer).
- Edit your score settings.
- Select your quiz category.
- Press "Create a quiz".
- Embed HTML code in your collaborative learning environment OR do what Barbara did, create a link to the quiz form.
- Note that you can change your quiz after saving. However, all entries by quiz takers will then be reset to zero.
- Please post a link so that we can participate in your quiz.
Sunday, 4 July 2010
Google Docs Form/Spreadsheet for contact, surveys, quizzes and feedback
On 17 July, ELTAS is hosting a Tech Tools Day for teachers of English. To prepare for it, I'll be posting tasks on this blog. The first task:
Make a survey or contact form on your blog using Google Docs Form/Spreadsheet. This form can also be emailed to users. It allows respondents to input information that is then collected neatly in one spreadsheet. Some possible uses for this function are:
To demonstrate how Form/Spreedsheet works, here is a survey made using the app.
This is how Google introduces their app:
Step by step:
Decide on the function your Form will have. Create the form and publish it to everyone on your blog. Please post a link to your Form here, under "Comments".
Make a survey or contact form on your blog using Google Docs Form/Spreadsheet. This form can also be emailed to users. It allows respondents to input information that is then collected neatly in one spreadsheet. Some possible uses for this function are:
- Creating a general contact form
- Providing a sign-up form for specific courses
- Creating a needs analysis form for potential students
- Quizzing your students on content taught (open questions, you will assess)
- Feedback on student work published on your blog or Ning or other Collaborative Learning Environment by everyone in your class
- Feedback on your teaching by participants in your course
To demonstrate how Form/Spreedsheet works, here is a survey made using the app.
This is how Google introduces their app:
Step by step:
- Go to docs.google.com If you don't have a Google account yet, follow the directions and create one
- Go to "Create New/Form" or "/Spreadsheet". These two are simply different modalities to create the same questions. If you go through Spreadsheet, click on "Form" to edit the form itself.
- Enter title, intro text and begin adding individual questions by clicking "add item".
- Item title is the question, additional details can go in the second text box for each question. Item types include text (one line box), paragraph, multiple choice (only one answer), checkbox (multiple answers), choose from a list (only one item), scale (viz 1-5) and grid. You can also format headers and page breaks.
- In editing mode, you can change the sequence of your items.
- When you're done, save.
- Select a template for your form and save.
- To embed in a blog, go to "More actions" and click "embed" for the HTML code. Copy and paste this code into your blog.
- To send by email to a selected group, Go to "Email this form" and enter the email addresses.
- To see the results of your survey, go to "See Responses".
- If you want to publish the results of your survey to a select group or to everyone, go to "See Responses" and select "Spreadsheet". There, in the right-hand corner, you will see the "Share" button. Select whether the sharing settings "Public on the web", "Anyone with the link" (your group only, whom you send a secure link to) or "Private" (you only). You can change these settings at any time. Then email your group, or publish the URL of the spreadsheet on your blog.
Decide on the function your Form will have. Create the form and publish it to everyone on your blog. Please post a link to your Form here, under "Comments".
Thursday, 27 May 2010
Blog carnivals to motivate you to share your ideas
There are several options if you want to write a blogpost to join the online community, without committing to writing a whole blog.
1. First of all, there is an EFL blog carnival every two months. Larry Ferlazzo invites submissions and hosts. Anything related to the teaching of English as a second language, including student work, is welcome. Your writing is first published in a blog of your choice, and then the link is entered in the carnival.
What to do if you don't have a blog?
August 1st will be at David Deubelbeiss’ EFL Classroom 2.0
October 1st will be at Ms. Flecha’s My Life Untranslated: Adventures of a New ESL Teacher in New York City.
You can contribute a post to any of these by using an easy submission form.
If the form does not work, you can send the link to Larry Ferlazzo using his Contact Form.
1. First of all, there is an EFL blog carnival every two months. Larry Ferlazzo invites submissions and hosts. Anything related to the teaching of English as a second language, including student work, is welcome. Your writing is first published in a blog of your choice, and then the link is entered in the carnival.
What to do if you don't have a blog?
- Open one using Posterous.com.The easiest solution around! Perfect if you want to post only occasionally!
- Write in our group blog Ask Auntie Web, a blog with a techie focus.
- Contribute a guest post to the most excellent http://www.teachingvillage.org/ run by Barbara Hoskins Sakamoto, which currently contains a lovely article by Emma Herrod on using LEGO rods (the way you may have seen Cuisinaire rods used). Directions on how to become a guest blogger are here.
August 1st will be at David Deubelbeiss’ EFL Classroom 2.0
October 1st will be at Ms. Flecha’s My Life Untranslated: Adventures of a New ESL Teacher in New York City.
You can contribute a post to any of these by using an easy submission form.
If the form does not work, you can send the link to Larry Ferlazzo using his Contact Form.
You can see all the previous fourteen editions of the ESL/EFL/ELL Blog Carnival here:![]()
Sunday, 2 May 2010
EFL Carnival of Lessons
Karenne Sylvester has just published the latest EFL blog carnival, dedicated to lesson plans. She's put the whole thing in a great looking presentation on her blog, Kalinago English.
I just had a look at them all (same order of sequence as presented) and took short notes on who did what:
I just had a look at them all (same order of sequence as presented) and took short notes on who did what:
- Sabrina De Vita - reviews the Present Simple and Present Continuous with a movie segment
- Mike Harrison - has students lipreading from a video, a new and interesting approach
- Nightwalker - is teaching students how to brainstorm most effectively
- Johanna Stirling - created a spelling code to crack / spelling puzzle to solve
- Shelly Terrell - presents Tagul, a tagcloud builder, and vocabulary resources to work with
- Anne Hodgson - uses 2 videos for business English (writing reports, small talk)
- Jessie Voigts - a collection of icebreaker ideas for YL and teens
- Larry Ferlazzo - does a class survey with activities about sleeping enough
- Mr. Foteah - is awarding medals for words
- Nick Jaworski - uses a video his students find funny to lead into creative writing
- Diana Diodati Konrad - is setting up the framework for negotiating in business Engl.
- Jeremy Day - is reflecting on how and how not to teach ESP
- Vicki Hollett - her dictation is "similar but different" to the listening comprehension
- Arjana Blazic - turns texts into Hotpotatoes gapfills, also has students writing
- Natasa Bozic Grojic - has nine roles to play in an argument over children using mobiles
- Barbara Sakamoto - uses the "sight barrier" information gap technique and realia with pre-intermediate adult learners
- Janet Bianchini - explores how to teach ppt from her own learning experience
- Eva Buyuksimkesyan - discusses the pros and cons of playing games in class
Tuesday, 16 March 2010
Past tense (irregular verbs)
Here's a lesson that I put together for pre-int students which presents the past tense (irregular verbs).
Irregular Past Tense Worksheet
Irregular Past Tense Worksheet
Friday, 5 March 2010
Preparing a Negotiation Role Play - Lesson description
Aim: to practice negotiating skills and the language of negotiating
Resources: worksheet, Preparing a Negotiation Role Play
Download: worksheet pdf
Preparing a Negotiation Role Play
Level : Adult learners B2 and up
Length: 60 mins
Method: Preparation: The students are put into small groups and asked to think of a real or hypothetical negotiation. They complete the worksheet and hand it to another group.
The other group may ask any questions they have about the situation.
Task: The groups then role play the negotiation they have been given.
At the end of the role play each group writes a short report.
Analysis and feedback: At the end of each report the group which prepared the role play can comment; "Was the outcome the one they expected (if hypothetical) or the actual outcome (if real)?" "Were there other options which were not considered?" etc.
The trainer then gives feedback.
By Diana Diodati-Konrad
Tuesday, 9 February 2010
Share your lesson idea
- Do you have a lesson plan, a warmer, a game, a controlled practice unit that has worked for you?
- Would you like to be part of a community of teachers who share lesson ideas?
- Would you enjoy having your idea published for all of the interested teaching community to see?
Here's how:
- Write up your lesson plan.
- If you have a blog, publish it there.
- If you don't have one, publish it on Ask Auntie Web. Contact us at info (at) melta (dot) de. We'd love to publish it for you.
Deadline: March 21.
Publication: April 1.
With this focus, the 15th blog carnival is sure to be a winner. Come on, everybody, join in!
See the EFL Carnival Archive
What is a blog carnival?
A blog carnival is a tool used by bloggers to promote their work. In a classic blog carnival, one site is designated as the host or organizer, and participants send in permanent links, or "permalinks", to posts on the theme of the carnival. The organizer collects the links in a single post, which becomes the starting point to all of the participating blogs. Good for readers, because it gives them access to a wide variety of blogs; Good for bloggers, who appreciate the publicity. (Summary of this definition)
Saturday, 6 February 2010
The 30 Goals Challenge
If you missed Shelly Terrell's "The 30 Goals Challenge" in January, she has made the 30 posts into an e-book. She blogged about a professional development challenge with an essential personal element, each connected to an aspect of paedagogy, online marketing or social networking, every single day for a month. Reflective and integrative. If you're thinking about where you're going as a trainer/ English teacher, and are looking for focus, you will certainly find inpiration here.
- Keep a Diary
- Contribute to a Blog Carnival
- Start an Adventure
- Support a New Blogger
- Update Your Online Profiles
- Set a Google Alert
- Step Out of Your Comfort Zone
- What’s Your Personal Theme Song?
- Be a Guest Blogger
- Make A Connection
- Ask, Perhaps You’ll Receive
- Reach Out
- Give Students Reign
- Cause a Ripple
- Create: 40 Writing, Music, & Art Resources
- Voice Your Appreciation
- Tell Your Story
- Let’s Move
- What Do You Believe?
- Seek Feedback
- Have a Bit of Fun
- 12 Resources for Giving Constructive Feedback
- Where There’s a Will
- Conquer a Fear
- Plant a Seed
- What Are You Putting Off?
- Reflection vs. Reaction
- Capture the Moment
- Stay Focused
- Pass the Baton
Subscribe to:
Posts (Atom)