Wednesday, 29 April 2009

Getting it up (1) – simple ways to start a web presence

We assume you need some sort of internet presence – to impress potential clients, to put on your business card, and so you and your students can communicate with each other. But you don't know how to build a website, and haven't time to learn. You want something you can have up and running in a few hours.

Your options are: blog, bulletin board (or forum) and a template-based website.

Blogs:
Originally just a way for people to write an online diary, blogs are now often used as substitutes for normal websites. This is because it's easy to add or change the contents: you don't need to buy or install any software. You use your web browser, and it's no more complicated (well, only slightly more complicated) than writing an e-mail.

To get a blog, there are two main sources: Blogger aka Blogspot, and Wordpress. Both of them offer free hosted services. ("Hosted" = the database containing the blog is on their servers. For a non-hosted blog, you have to have a web server, or rent space on somebody's server, and install the blog software on it. You probably don't want to do this: it only really makes sense if you want the blog to be part of an existing website.)

Blogger/Blogspot is part of the Google empire. For the hosted part, go to www.blogspot.com/ and set up your site. For instructions, try this video tutorial: www.youtube.com/watch?v=ryb4VPSmKuo.

If you don't want to live your entire online life as a citizen of one Google satrapy or another, try www.wordpress.com/. Wordpress has a more community, less big-businessy feel than Blogger. For a video tutorial (long, but very clear and helpful), see www.youtube.com/watch?v=MWYi4_COZMU. YouTube is, of course, also a subsidiary of Google.

Why a blog might not be a good idea:
Blogs make the most sense for publishing your latest comment. If you want a site that gives, say, a potential client a quick idea of who you are and what you can do, a blog won't work so well. Anything you wrote in the past will get lost in the links and archives in the sidebar: it's hard to get people to click there. And if you want to interact with your students, it's hard to organize a discussion into a coherent sequence on a blog: bulletin boards work much better for this. And there's an extra step (and some expense) involved if you want a nice personal url (e.g. your very own dot com address).

Here's a successful attempt to make a full website using blog software: www.badscience.net/, using WordPress. The blog format is suitable because the site is a succession of reports.
And here's an example (posted on the www.tefl-germany.de forum) where the attempt to use blog software to make a site didn't work: kid-learn-english.blogspot.com/.

Bulletin boards (forums):
Much better than a blog for running joined-up discussions on particular themes, so the best choice if your main idea is to interact with your students. Apart from anything else, a visitor to your forum can start a topic, which is not possible in a blog. But a forum is not as good as a conventional site for presenting yourself as a business to prospective clients.

If you go for a forum, you'd better be sure that enough people will contribute. The lists of topics ("threads") in forums usually include counts of the number of people who have viewed and replied to each topic. Too many zeros here can be deeply embarrassing. (The trick is to contribute yourself under lots of different names, at least at the start: if you find that you're still doing this after a couple of years, you'd have been better off with a blog, or perhaps a household pet to talk to.)

As with blogs, forums can be hosted by a provider or can run on your own server. Unless you're a business with an IT department that knows about databases, you want a hosted service. Typically, they are free if you don't mind the provider putting ads on your page. Otherwise, you can pay them a bit (maybe $5 a month) to keep the ads off.

The www.tefl-germany.de/ forum uses the provider Yuku: www.yuku.com/. It's worked well for us since 2001. ("Well" here meaning: the site is hardly ever unavailable, and the posts don't get lost in the cyberwilderness.)

Websites:
I mean, a conventional small-business website: a homepage to say who you are and why you're good. Another page or two with references, a c.v., something about the methods and the courses you offer. A page with some clever tips for your students, or links to other sites if you can't think of any clever tips. And your contact details.

Much better than a blog or forum if you don't desperately want input from your visitors. And after all, it's bad enough having to interact with language learners while you're getting paid for your time. The problem is: it's more complicated to set up a website than either of the other two options (which is why a lot of people go for blogs and forums).

What you need is:

  • a server
  • a url (www...............com or .de or .co. uk etc.)
  • your content, formatted as html
  • some software to upload your content to the server.


Fortunately, there are hosted services that meet (or get round) all four needs, cheaply or for free. They provide server space, let you register a www name, and provide a selection of page design templates for your content. You access these templates through a web browser, which removes the need for special uploading software.

The first place to look for such a service is probably your internet service provider. T-Online, for instance, at homepage.t-online.de, offers a free service to existing customers, with a "Design Assistent" to create your pages (up to three), one .de domain, a blog function, etc. For € 4.99 you can have a lot more pages, and more stuff to put on them. Otherwise, the biggest (and, it seems, most reliable) provider in Germany is www.1und1.de, which offers similar packages from € 3.99 up.

Incidentally, when Germans say "Homepage", they usually mean "website", not "home page". When they say "Website" (pronounced "vepzide") they usually mean "web page", because of a confusion with "Seite". This can cause endless amusement when you're teaching English to web developers.

So there's no excuse for not getting an online presence immediately(ish). To make anything posher and more creative, you'll really have to learn a bit about how html works. Nothing about html is intellectually demanding: there are no obscure concepts. But it's rather like the offside law in football, or the use of the present perfect continuous: there are a lot of exceptions and fiddly details. In my next post: the easiest way to learn all about html.

A video to make you think about using Web 2.0

Here's a lovely blog about technology and learning called Pair-a-dimes for Your Thoughts by a teacher called Dave Truss.

Have a look at this video David put together about teaching and using Web 2.0. technology:


Find more videos like this on Classroom 2.0

Classroom 2.0 is also a community you might like to consider joining. You'll find me up there!

Monday, 27 April 2009

Can RSS feed help you?

If you look at the top of this screen where the url for this blog page is displayed, you will notice a little icon on the right of the blog url that looks a bit like this - only it's smaller:


Maybe you've even wondered why it appears after certain urls and not after others.

Well, the reason for that is that it indicates whether a site has RSS feed or not... and our blog does.

Whoopee!

OK, so what is RSS feed?

RSS stands for Really Simple Syndication.

'Ah-ha!' I can hear you all saying.

And what on earth does that mean?

Don't ask me...

I don't know why anyone called it that either, but basically RSS feed can be used to get information that's on a site - and it's particulary useful if the information on a site, blog or forum is updated regularly because you can subscribe to the RSS feed and get that information sent to you (by clicking on the RSS icon in the url) - don't worrry you won't be asked to pay any subscription fees!

Once you've subscribed and added the RSS feed to your personal homepage (see previous post for information about how to set up a personal homepage), the RSS feed will automatically update the information displayed there if/when new posts appear on the site you have suubscribed to.

This little video clip gives you all the information you need to get started.

Creating your own personal homepage/RSS feed reader

If you are like me you probably find that you don't really have time to check all your favourite websites for new posts/information, so maybe you ought to think about creating your own personal home page which you can set up so that it automatically gets any new posts or information using RSS feed and displays them there.

To get a better idea about what a personal homepage is all about watch a training video by Nik Peachey, a learning technology consultant, writer and teacher trainer or read his blog

If you'd like to see an example of someone's personal homepage, check out Glady Baya's Pageflake site.

Here's a screenshot of mine:

Finally, here’s a site which compares the most commonly used personalized home pages: www.mashable.com

P.S. If you don't know what RSS feed is, watch this space!

Sunday, 26 April 2009

Using TED in the classroom

The annual TED conference brings together the world's most fascinating thinkers and doers to give short and concise talks about their work to their peers. It's an invitation only event, but luckily for us the best and most popular talks can be seen and downloaded (as audio or video files) for free.

The talks range in length from around 3 - 25mins and can be used in a number of ways in class.
One of my favourites, as it's short but also very interesting and relevant is this one by Richard St. John. In 3mins he gives us the 'Secrets of success in 8 words'.


Here's how I have used this in my lessons > level B1+:

1. Get your students to brainstorm what they think leads to success. This could be done as a pair activity with reporting to the whole class or as a whole class brainstorming activity.
2. Depending on the technology available to you, play the presentation in audio format only for students to listen for the key words. Play it 2 or 3 times if necessary. At this stage though, tell them to listen only for the key words. He speaks quite fast. This talk can be downloaded in MP3 format to you computer. From there you can either play it directly from a laptop, from an MP3 player, or burn it from your pc to a cd and play it on a cd player.
3. Compare St. John's tips with those the students brainstormed and discuss. You could also have a few comprehension or questions based on his content.
4. Show your students the video. This can be downloaded separately and shown on a laptop or using a projector, or viewed directly on the website, depending on which technology you have available in the classroom. If none of the above options are available you can get students to watch the video at home before the next lesson.
5. Conclude by discussing the power of presentation visuals, body language, and being able to see the person you're listening to. Your students will understand more from the video than from the audio version of the talk. In this sense you could change the topic and lead into the topic of presentations with your students, if they're Business English students, for example. If not, I still think this video/presentation is relevant for all students as success is not merely confined to business.

If you try this with your group(s), please post a comment and let me know how it goes or if you can recommend any variations to the suggested lesson plan.

Moodle yourself

We had a nice Moodle 101 course yesterday at MELTA in Munich and I realize that many people who didn't take part might also want to have a look at a Moodle course to test the waters. If you are one of those, just get in touch with me. The link to the site is http://annehodgson.de/moodle.

The workshop was planned as a one-off event, but there are materials and a few YouTube tutorials for self-study, plus a couple of courses I've put together.

Friday, 24 April 2009

Fun sites

Here's a site that is fun, but not essential:

Tag Galaxy

If you put in a search word (it could be the name of a city, a product, a flower, or your postman) into the 'Tag' box and click 'Go' and Tage Galaxy will select photos from Flickr (a site full of photos) and put together a world showing you the images it found.

Here's an example of an image the site will create if you put in the 'tag' Munich.

And here's what Earth Album put together for Munich... which is another fun, but not essential site.

Earth Album is a mixture of Google Earth and Flickr.

Have fun!

And if you have a fun, but not essential site to add to the list, please post the details up here.

Thursday, 23 April 2009

Moodle

From the MELTA News archives:
Dear Cousin Web,

I’ve been hearing a lot about Moodle lately. The MVHS has it now, and so does the LMU. Recent CELTA courses have been using it, and even my kids have got Moodle at school. So what is it, and do I have to learn how to use it or even get Moodle myself?

Love,
Madeline

Dear Madeline,

Moodle (http://moodle.org) is course writing software that is used to create “online learning environments”, or “virtual classroom” websites that can be stocked with all kinds of contents, including media, exercises and links. In addition, Moodle includes communication tools, such as forums (where you and your students can leave written messages for the whole course) and chats (where you can all log in and text each other to your heart’s content). There are nifty course management tools for assignments so you can organize the feedback you give your students as well as various tools to give your students both automatic and personal feedback on their work.

So, Moodle is not a commercial platform that comes already stocked with materials, like Macmillan English Campus. It needs to be filled up by a person who designs and writes the course. It’s “open source software”, which means the source code can be looked at and understood by people who can read it, and it’s freeware that can simply be downloaded on the Internet. Anyone wishing to set it up needs quite a bit of technical skill, though, and I had to get help to set up my Moodle site. There are some costs involved, too, since you need to rent space on a server to host your Moodle site.

So do you have to get Moodle? No. But it’s not at all difficult to use if a school you work for has it. You needn’t be put off if there’s not much content in a Moodle site, as it can be quite fun to put together a course with brand-new material, right? Be sure to attend an introductory workshop to see what it’s like to work with this tool before you take the plunge. I really recommend creating a lot of interactive quizzes, which your students will love to click away at for instant feedback. I took my extensive Moodle course with the Bayrischer Volkshochschulverband. It was run by Margit Kanter, and many VHSes are now offering courses run by alumni of that program. Just talk to your local VHS course coordinator.

Now, do I use my own Moodle site much, is the demand high? Frankly, no. I have offered blended learning courses, where my students are assigned homework and projects. Moodle makes it easy to manage assignments and the ensuing correspondence, to find things, get and send messages, post and read feedback, use links etc. Everything is neatly organized, very pleasant. No hassle with incoming emails and attachments. So Moodle shines as a platform for a classic teaching setup, with the teacher giving and correcting assignments in a virtual classroom. I’ve had courses like that, for instance Jobline for the LMU, but not many others so far. Why? Frankly, my adult learners don’t have the time or inclination to do homework. If they want feedback from me on their written work, they will tend to mail me directly.

That’s not what I originally intended to do with Moodle, because for one thing my teaching is generally much more geared to what my adult learners need ad hoc. Also I promote collaborative learning projects that need initial input from me but give my students a lot of leeway, and I was hoping the Moodle forums would work well for that. However, Moodle’s weaknesses are the weakness of online learning in general, namely that it is exceedingly difficult to create the many dimensions of spontaneous social interaction and learning in a more or less text-based online environment. There is just no way that Moodle, even when you add a lot of extra technology such as Second Life, can replace the face-to-face interaction that is so productive in collaborative projects.

Then, Moodle is a closed-off, password-protected platform. This is nice if you want to keep your virtual classroom door closed. On the other hand, you don’t get the surprise visitors that add spice to life. Being out in the Internet, surfing around and posting comments in open forums can be far more stimulating than what a small group of people can produce. So open-access blogs and wikis that everyone can read but only your and your invited students can write in might be better, after all.

The rest are didactic details. I’m not happy with the Moodle blog function. I was originally hoping that students would keep their own blogs to chart their learning progress, but that’s not happening. Few people are born bloggers - they prefer a clear assignment. Also, while wikis are wonderful tools for collaborative learning, the Moodle wiki is too complicated for students to have fun with. When technology is not really great to work with, it’s counterproductive, because it puts people off completely.

That said, I do think online learning platforms are here to stay. And frankly, I much prefer any type of platform that lets you look at the code and add your own contents over one that provides you with a closed box of contents and charges you an arm and a leg for it. So Moodle is good. Take a good course to find your footing and get started. We’ve only just seen the tip of the iceberg in education technology, so I guess I’ll just have to keep moodling through.

Love,
Cousin Web

Want to set up a Moodle site to practice on? Go to NineHub.com, a free webhosting site where you can experiment to your heart's content.

Just starting out with blended learning? Read Pete Sharma & Barney Barrett, Blended Learning. Using Technology in and beyond the Language Classroom and Gavin Dudeney & Nicky Hockly, How to Teach English with Technology.

You’re a teacher already using Moodle and want to expand your didactic range? Read William H. Rice, Moodle Teaching Techniques. Creative Ways to Use Moodle for Constructing Online Learning Solutions for ideas on how to use the Moodle features quiz, question, choice, wiki, glossary, lesson and workshop.

You're a teacher who wants to explore the potential of online learning for promoting learner autonomy, and learn a five-stage didactic model that works? Read Gilly Salmon, E-tivities.

Want to see a really nice Moodle site? There are lots out there. The Open University LearningSpace is probably the biggest one.

A great online community on Ning, the social networking site, is dedicated to Moodle discussions: iMoodle

Experimenting with Moodle and online learning may be fun for us, but will the students enjoy it? Caveat! Just watch highschool students complain about the way their teacher uses Moodle for everything:

Wednesday, 22 April 2009

Converting your files to PDFs

Sometimes you may want to send a file to someone who doesn't have the program you used to create it... and when this is the case, you will need to convert your file to a format they can open and read.

A pdf file can be opened and read by anyone who has Acrobat Reader installed on their PC - and even if they don't have it installed, they can always download it for free.

The most expensive way of producing pdf files is to buy Acrobat Professional, but if you don't want to pay several hundred euros, you will be pleased to know that you can download a pdf printer/converter progam for free (and if you use Word 2007 you will find it can convert docx files to pdf files).

I'm not going to recommend a program because there are hundreds of them out there and I don't know whether one program is any better than the other, just stick pdf converter download into Google or whichever search engine you use and press 'Search'.

You may find you have to pay a few euros to get a decent pdf converter, but you can probably find a good one for less than €30.

Monday, 20 April 2009

Converting file formats

> "Privately and at school I often attach files to e-mails, and I have
> my first steps behind me in scanning pictures and documents, but I
> still feel being quite a baby. Last week I wanted to create a jpg
> file, but I got a pdf file (I don’t know yet why. Maybe I should ask
> Auntie Web)."

If you want to create a jpg file, you should copy the image you want to convert and paste it into your Paint program. Paint is a Windows program that came with your PC if it runs on Windows.

To find Paint:


  • Click on the Windows 'Start' button in the bottom left-hand corner of your screen.
  • Select 'Programs'.
  • Select 'Accessories'.
  • Click on the program 'Paint'.
  • Paste the graphic you want to convert to a jpg into the screen.
  • Then click on File --> Save as... and make sure you save it in as jpg file and not a gif or tif type file. (You can do that by selecting jpg from the 'Save as type: box' at the bottom of the 'Save as' screen.
  • Alternatively, you can download free software that will convert most image formats, e.g. Converter

    The site also lists several other free file conversion software which should let you convert most files from one format to another.

    Saturday, 18 April 2009

    Ann Foreman: Encouraging Learner Autonomy

    A talk I missed at IATEFL, and I've been kicking myself for it ever since, was by Ann Foreman, the Information and Communication Technology Coordinator at the British Council in Bilbao, whose blog is an incredible source of information on using web technologies wisely in teaching. Her blogname "Encouraging Learner Autonomy" (http://encouraginglearnerautonomy.blogspot.com contains the message. Her "how tos" are clearly written - lists! - and easy to follow.

    Her blog is written systematically, starting out with "What are blogs?", so you can work through it step by step. A recent post includes directions for her students, "Read, listen and record a podcast task", which gives you a very good impression of the skills and hardware you and your students will need if you are going to do a podcast project together. Ann Foreman's blog is yet another reason to take off a week and to do some online self-study.

    With people like this involved in promoting Learner Autonomy, I'm seriously considering joining the IATEFL SIG www.learnerautonomy.org.

    Thursday, 16 April 2009

    Converting Flash video to mp4 and mp3 online

    You know that the YouTube Flash videos (flv) are easy to convert online into mp4s (the iTunes format) and to download onto your computer using www.savevid.com. But online conversion of non-YouTube videos is not quite as simple. For any conversion you must first find the URL of the video you want to convert. How? YouTube and a few other sites post the URL plainly, but often you need to be a Sherlock Holmes to find the URL. Step one: Play the video. If it opens up in a new window, you'll see your URL in the browser window. If not, you're lucky if you have Safari (Mac), which allows you to find the URL easily, as Frieda Pattenden first pointed out to me:

    Go to the Safari browser bar and select "Window". Then go to "Activity". This opens up a long list of file names that the computer is busy with. Look for a large one that will probably contain "watch?" or "flv".

    Once you have the URL, you can use any of a number of sites to convert the file into an mp4 video or even an mp3 audio file. Since audio files are much smaller than video files, conversion into mp3 is often quicker than into mp4. I actually often like to go for a sound bite accompanied by a film still - a very nice media combination for teaching.

    So: To convert online video to mp4 or mp3 I use Safari in combination with iTunes. The online sites I use for this are www.convertdirect.com for mp4 (video), and www.flv2mp3.com for mp3 (audio).

    Option 1: video to audio

    Let's start with coversion of Flash video into an audio file using www.flv2mp3.com:
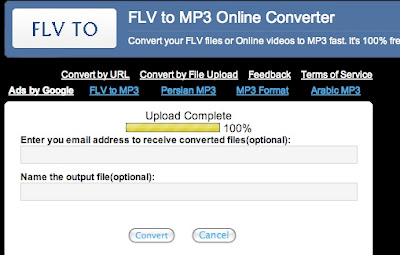
    Copy and paste the URL into the flv2mp3 URL window (see illustrations) and click "I accept the terms: OK".


    The site then uploads the file and says "upload complete". Don't enter your email or the output file name. Just select "convert".


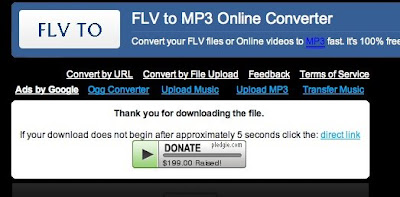
    Once the file is converted (after a few seconds), your iTunes will automatically detect a new file to play and open up. In iTunes, rename your file and put it in a folder where you can find it. Mp3 - Bingo!

    Option 2: video to video

    Now for conversion of Flash videos into an mp4 video file using www.convertdirect.com:
    1. Copy the URL into the URL window at www.convertdirect.com (this works with any FLV file, not just YouTube)
    2. Select the output format MPEG4 + AAC.
    3. Type in your email address. You can also download the converted file directly, but I find the process takes quite some time and don't want to wait. Leave your browser open: If you close it while the file is being processed, you can't be sure that the process will be completed.
    The program will take some time to process the file and then send you an email with a link to a page sporting a big "Q" for "Quicktime". In your browser, save that page using "save file as...". Mp4 - Bingo!


    If any of this doesn't work for you, or if you have any tips on finding the URL for videos using a different browser than Safari, we would love to hear from you.

    AuntyTech

    Our blog has a like-minded, if infinitely more experienced sister in AuntyTech, Donna Baumbach, edtech/edmedia professor at UCF in Orlando, who advertises herself as "retired but not dead yet". You'll find her amazing wiki (co-written with associate professor Judy Lee) filled with loads of tips on using technology wisely in education here: http://webtools4u2use.wikispaces.com.

    This is a brilliant example of how you can use a wiki as a kind of online reference manual. You could easily just take a week off to explore the great links relating to What You Always Wanted To Know About Technology In Education But Were Afraid To Ask. Have a look! Follow AuntyTech on Twitter: http://twitter.com/AuntyTech

    Wednesday, 15 April 2009

    Webquests

    This article from the MELTA News archive was written by Lucy Mellersh.

    Dear Auntie Web,

    What is a webquest and how can I use them in my teaching?
    Love Quentin

    Dear Quentin,
    Webquests are tasks where students have to look in (usually pre-specified) web pages to find the resources for completing the task. A non-web version of this activity might involve bringing a pile of books and other resources to class, or taking the class into the library. Using the web is the modern equivalent and just makes the research a lot easier.

    This sort of activity is particularly good for language teaching and provides lots of opportunity for authentic experiences with the language (particularly reading, but also listening). Of course, your students will need to have access to computers, either in a language lab (e.g. the Lernstudio at the Gasteig) or if they have their own computers, they could do the research as homework. And of course, you will have to have access to a computer to find appropriate websites that wou want your students to use when doing the task.

    Webquest tasks can be created in any medium (a photocopy, a webpage, or just written on the blackboard). The results can also come in any medium (poster, speech, presentation, article, itinerary, play). The research should happen at least partly on the web.

    For purists like the Daddy of webquests, Bernie Dodge, webquests should also fulfill various other criteria such as:
    * The webquest should be based around one overarching task that is similar to a real-life task.
    * This task should be gripping. There should be an introduction that catches your attention. Here are some task suggestions:
    * Reproduce information (create a quiz for the rest of the class)
    * Compile information (find out about something from various sources)
    * Solve a puzzle or amystery
    * Report on an event (write a newspaper article reporting on an event from history)
    * Plan something (an itinerary for a trip)
    * Create something (design a poster)
    * Solve a conflict or find a compromise
    * Persuade (design a marketing brochure)
    * Analyse (give pros and cons)
    * Judge (decide on judging criteria and choose a winner, giving reasons)
    * The webquest should contain only open-ended questions.
    * The activity should include face-to-face student interaction, preferably as group work. Students are often given specific roles within their groups (e.g. the business magnate, the town planner, the environmentalist).
    * Students must be able to view the grading rubric (and there has to be one).

    I often recommend using a free online tool called Trackstar for creating activities based around researching on the web. The advantages of creating an activity using Trackstar are: students see the real web page in a frame. The corresponding task or question is shown in an area above the page (this keeps them on-task). The student's next step is shown in a column on the left and accessed by a mouse click. This is comforting for non-techies, saves students from typing in web addresses or searching, and it keeps them in the right place.
    The disadvantages of using Trackstar are: Some web pages refuse to be framed. Trackstar is as prudish as Americans can be (no mentions of sex, drugs or alcohol are allowed). Trackstar doesn't let you link to more than two separate pages of a particular website from the same track (this is for copyright reasons).


    Here's an example of a very simple language-teaching webquest that I made in Trackstar. It's on the Internet and you're welcome to use it with your classes. The task is given verbally before they start:

    TASK: "Your class has clubbed together for a treat for your teacher, you're sending her on an all-expenses-paid weekend to London. Money is no object. Choose the best itinerary."

    PROCEDURE: Working at your own computer, go to Trackstar.
    Click on "View in frames" to start. You'll see the first task at the top and the corresponding web page is in the middle.

    When you've chosen something (hotel, restaurant, show) that you think your teacher would like, note it down (pen and paper!!) and click on the link to the next step in the sidebar.
    Once you've chosen an itinerary for your teacher, discuss your proposal with your partner or group and come to an agreement on the ideal weekend. Decide which member of your group will present the revised itinerary to the class explaining why you think she would like each of the things you've chosen.


    To create your own tracks in Trackstar, you need to sign up for free at http://trackstar.4teachers.org.
    For more information about webquests, look at this rubric for assessing how good a webquest is
    http://bestwebquests.com/bwq/matrix.asp
    If you have time, you can explore more links about web quests on
    http://midgefrazel.net/lrnwebq.html

    Love from Auntie Web

    PS: Can you share a webquest you made with your class with us?

    Monday, 13 April 2009

    Ask Bruce! On BBC WebWise

    The BBC has a wonderful site dedicated to those of us starting out on the web, and you can "Ask Bruce" questions and get instant responses. http://www.bbc.co.uk/webwise/askbruce/

    Sunday, 12 April 2009

    Wikis

    This article from the MELTA News archive was written by Lucy Mellersh. She also set up a wiki for MELTA at http://melta.wikispaces.com:

    Dear Auntie Web,
    I keep hearing my students talking about wikis. I don't want to show my ignorance by asking what they are. Could you help? Love from Victoria


    Dear Vicky,
    A wiki is a website with an edit button. Clicking on Edit transforms the browser into an editor and you, the reader, into a co-author.

    For starters, here's Lee Lefever's introduction to Wikis in Plain English:


    • Wikis are free
    • Wikis are very easy to create and change, you don't have to know any html. You notice a typo? Just click on Edit, correct it, and save your changes. Some information is missing? Just click on Edit and add it.
    • Wikis are designed to be edited by groups of people rather than just one individual. Wikis are perfect for collaborative projects because they allow a group of people to work together on the same document.
    • Wikis are stored and edited on the Internet so you can access them from anywhere.
    • The history of changes to a wiki is stored alongside the wiki itself, so you can easily revert to a previous version.
    • A discussion area is attached to every wiki page where you can ask questions and make suggestions about that page.
    • Wikis are good places for collecting and structuring information. A wiki is a linked group of pages that can include text, pictures and even audio or video clips.
    The best known use of a wiki is for Wikipedia http://wikipedia.org/ an online encyclopedia written by its readers. But don't let this example restrict your ideas about ways to use a collectively edited website with your classes. There are several types of wiki in use, all wikis achieve the same aims using slightly different software. For some wikis, such as Wikipedia, you will need to use commands for formatting text, I like to use Wikispaces because there are no commands to learn.

    What about business English?

    In the business world, wikis are increasingly being used as knowledge bases in company intranets. Specialist information can be recorded that might otherwise be lost when an employee leaves. Wikis remove the bureaucracy that creates obstacles to the collection of knowledge.

    Wikis in the classroom

    If you've ever thought it would be nice to have a class website, a wiki is ideal. The wiki format is particularly suited to mixed ability classes because it allows everyone to contribute in their own way. Creating meaningful content brings the language alive, students will be scanning and reading for gist when searching for information to include. Students can edit and add to each-other's stuff thus honing their composition, grammar and vocabulary skills, while playing a part in creating a piece of work they can all be proud of. Here are some ideas for using wikis with your class:
    • A city guide for Munich or for a town in an English speaking country.
    • A class or language school web page showcasing student work or with useful info about nearby cafes and parks or the closest public transport.
    • Students can work on wiki pages focussing on a hobby, interest, or a subject relevant to their work
    • Create a wiki project around an existing story. If you're dealing with a particular book or film in your class, you could create a wiki to expand on this theme. Get students to write imaginary interviews with the characters, tell the story from a different point of view, describe what they think happened next, or what happened before.
    • Students could compile a guide giving tips and links for practicing English
    • Students could collect information about a particular aspect of the target culture. The Edinburgh Fringe, American food (with recipies), table manners, the South African music scene.
    • Create a learning record where language tips and vocabulary can be collected and expanded upon as they come up in class. Asking a weaker student to put something into the wiki will help them to review it and gain a deeper understanding of the topic. You can check and modify the resulting information.
    • Students could make a wiki about accents or regional language differences (you can even embed audio and video into a wiki).
    • A glossary of difficult words and phrases. Students could just add a word, or they could attempt to define it or describe its use.
    • Students could write reviews of easy readers from the class libarary
    • Teachers could share teaching ideas to go with a particular textbook or curriculum unit.
    • Teachers could collect and structure teaching ideas and reviews of teacher development workshops.
    Wikis support collaboration regardless of the time of day or location, so you could even use the wiki in projects with partner classes abroad.


    Editing a wiki

    Try out an existing wiki at
    http://melta.wikispaces.com
    1. Go to http://melta.wikispaces.com/Limericks
    2. Click on the Edit button (anyone can edit it).
    3. Make your changes (maybe by adding another limerick), the editor works like a simple word-processor.
    4. When you're finished, click on the Save button (you can also leave a short note about the edit and give your name in the note field at the bottom of the page)
    Joining Wikispaces
    There are many implementations of the wiki idea. Wikispaces http://www.wikispaces.com is easy to use and free and therefore the perfect wiki for beginners. Create an account with Wikispaces by choosing a user name, entering a password and your email address and clicking on the Join button.
    Creating a wiki
    Create a new wikispace for your class, your school or your community. Do it at the same time as joining from the Space name field on the Join Now! page, or if you're already a member, click on the Make a New Space link under Actions. Choose a name for the wiki, this name will be shown at the top of the pages as well as becoming part of the web address. For example, melta.wikispaces.com A tutorial will walk you through some of the wiki basics, or you can just start by editing the first page (Home).

    Linking

    Create links from your wiki by highlighting a word and then choosing the link icon (looks like a chain).
    A window appears asking where you want to link to. Choose from a list of pages belonging to the same wikispace or enter a URL to link to an external web page.

    Adding a page

    Create additional pages by clicking on New Page at the top of the sidebar on the left. Pages created in this way will automatically get added to a table of contents on the left.

    Note that you can only create new pages when you are logged in. You will be prompted for a page name.

    Adding pictures

    Upload images and files from your computer and add them to your wiki or add them directly from the Internet. Only logged in users can upload files and images. Click on the picture icon
    A window appears where you can browse and upload files from your computer. Once you've uploaded the image it will appear in the window, double-click on it to insert it onto your wiki page.

    Adding members

    Once your wiki is set up, you might decide to restrict editing to just your own students.
    1. Ask your students to register with wikispaces.
    2. Ask them to request membership of your space by clicking on the Join this Space link near the top of their sidebar.
    3. Go to Manage Space (link in the sidebar)
    4. Under Space Settings, click on Members and Permissions
    5. Scroll down the page and add them from the list of Pending Membership Requests
    6. When all members of your class have joined your wiki, click on Protected under Space Permissions to stop other people from being able to edit.
    Useful links Wikis for teachers
    These two sites offer educational resources for teachers and they provide a platform for sharing learning materials you have created: Love, Auntie Web

    Saturday, 11 April 2009

    Marc Prensky

    Marc Prensky, a leading proponent of using games, YouTube and mobile phones to teach school children using their favorite tools, and the author of "Don't bother me Mom - I'm learning", held the keynote speech at IATEFL. Here's an interview with him by Gavin Dudeney (video).

    http://www.shv.me/post/94136073/iatefl-q-a-with-marc-prensky

    Posted using ShareThis

    Thursday, 9 April 2009

    Create your own podcast

    Quick and dirty:

    (http://www.tinkernut.com)

    Repeating the video in writing, for PC/ Windows:

    1. Download Audacity from http://audacity.sourceforge.net. This will create a folder called "Audacity" In your Program Files
    2. Then download the MP3 encoder, called LAME, and extract it into in the Audacity Plug-Ins folder
    3. Open up Audacity
    4. Press record
    5. Cut and Trim, Remove Noise, Normalize
    6. Export as MP3, save under a name you choose
    7. You can add tags, e.g. from http://mp3tag.de
    8. Next, upload your podcast to the site that will host your podcast. This video recommends http://www.podango.com but they are currently on vacation. The one I got started with is completely free, http://www.podomatic.com. The ones recommended by Blogger are http://box.net, http://bluehost.com, http://movedigital.com and http://dreamhost.com, but it looks like you have to pay a minimal monthly hosting fee.

    For Mac:

    You want to simplify your life? Buy a Mac and use GarageBand, recording software that lets you export your audio file as an mp3 and upload it straight into iTunes. You could also use Audacity on the Mac to create a better-sounding mp3 file, but I don't. And you were wondering why people like Macs? Well, there's your answer.

    Combining your podcast and your blog:

    If you're like me, you might like to combine your podcast with your blog. If you have a WordPress.com blog, there are podcasting plugins (Podpress and Blubrry Powerpress) that go with the blogging software. And since you already have a host with a WordPress.com blog, you have a place for your audio files, too.

    If you are using Blogger, you do need to find someone to host the audio files. But that works fine, too. Watch:


    Again in writing:
    1. Find a host online for your podcast (again, I recommend http://www.podomatic.com), but they have some other recommendations.
    2. In your Blogger blog, enable "Enclosure Links" under "Settings" and "Show links"
    3. When you write your post, click on "Add enclosure link" and type in the link of your hosted audio file. That turns each post into a podcast, including your text and the mp3 file.

    Listen to your podcast by using RSS feeders, or "podcatchers". The easiest one to use is iTunes:
    1. Go into iTunes, pull down the "Advanced" menu and click "Subscribe"
    2. Enter your podcast URL, which is your blogspot address, followed by "/feeds/posts/default"
    The title of each podcast will be the title of your post. The description will be the text in your post.
    For more help, go to http://help.blogger.com

    Podcasts

    I don't think I need to say anything... either you know about these things or you don't.

    If you don't, you are probably my age and looking forward to not being challenged by more new technology. ;-)

    The "Common Craft Show" video series is for baby boomers who are still interested in what's going on on the techie front and aren't neo-Luddites (yet).

    Here's a video clip about podcasts - Podcasting in Plain English.


    Wednesday, 8 April 2009

    Want to speed up your 'puter?

    If you want to try and speed you PC or laptop up a bit, you might like to think about using the Disk Defragmenter tool that comes with Windows.

    The Disk Defragmenter tool is found by clicking on:

    1. The Windows Start button in the bottom left-hand corner of your screen.
    2. Selecting the Programs menu.
    3. Accessories
    4. System Tools
    5. Disk Defragmenter

    A screen like this one here will appear.

    Click on the 'Defragment' button at the bottom of the screen and go and make yourself a cup of tea (or two) whilst Windows optimizes the way the files are stored on your hard disk. The program works by reading and writing the files stored on your hard disk to minimize head travel time and maximize the transfer rate.

    Just how long the program takes to optimize your hard disk will depend on the size of your hard disk and the amount of data stored on it, but reckon on at least 20 minutes to half an hour.

    When the program has finished those horzintal bars at the bottom of the screen should hopefully look like this:

    No red 'defragmented' files to be seen in the lower bar, just blue and green blocks... and if your hard disk was seriously defragmented, you may even notice an improvement in performance.

    You'll find more imformation on the website The Elder Geek.

    Tuesday, 7 April 2009

    The best podcasts - Rod Zook's Top Ten

    There are about 15 podcasts or videocasts I listen to or watch more or less regularly. In my estimation, the best English subscriptions are:

    APM: Marketplace Conversations from the Corner Office


    Career Tools and Manager Tools
    Manager Tools has been running since about 2005. The hosts have worked together in various capacities for years and have turned their friendship and business / management skills as well as their consulting network into a global audience. For the past year or so they have provided in depth workshops and seminars at numerous locations and have expanded their podcast site to include a range of gratis and premium resources that are often very valuable for students but also for someone who is self-employed.
    Several months ago they expanded their focus to include "Career Tools", which targets another audience and therefore a different group of my clients. I routinely suggest the links to students and some of the more advanced of them listen on occasion.
    Because they are friends and Americans, their comments can sometimes be a bit melodramatic and chatty, but I then suggest that's an element of cross-cultural communication.
    Manager Tools has won numerous web awards and is almost always worth listening to.


    KCRW's Left, Right and Center
    Left, Right and Center kept me sane through the primaries and presidential campaign and election in 2008. It's my weekly dose of political analysis and consistently goes beyond simple sound bites or confrontation for the sake of confrontation.


    Tips from the Top Floor
    Tips from the top floor is similar to Manager Tools in that it has gathered a global audience and has lead to workshops and seminars and fan groups on several continents. It's different in that the host is German and based in Tübingen. The content focuses on digital photography and is a welcome diversion from business and politics! I recommend it to students for that reason and to give them a model of a German who has really mastered English. They can too.

    New Yorker cartoons
    The animated New Yorker cartoons are vintage New Yorker magazine. I enjoy them for their insights and typical American humor. I have tried a few of them in class as warmers or fillers, especially if the learner is a cat or dog lover.
    AND last but not least -- perhaps my favorite:

    I know it's not English, but it pulls me back to some political reality much like John Steward might on the Daily Show.

    Of course, I don't follow them all religiously, but there's some good input there and always available when I feel like it or to help me speak intelligently in some course or group.
    But now because the baseball season started yesterday, there's even more competition for my time. I also know the link to MLB.TV and enjoy several games per week. I hope you'll excuse me, but I need to go watch the San Francisco Giants home opener live! It starts in about 30 minutes and I need to get a few things done before that yet!

    Monday, 6 April 2009

    Anything Audio


    The Ask Auntie Web column in the Spring edition of MELTA News featured "Anything Audio". Over the next few days we'll be reprinting the column here with all of the links in place for your convenience.

    A member, let's call her Audrey, wrote in asking,

    Dear Cousin Web,
    I think I'm missing out on audio available on the internet. I'd like to use it more in my classes, but I'd also simply like to listen to English broadcasts and podcasts myelf. I can listen to everything on my computer when I'm online, obviously, but what do I need to do if I want to subscribe to a weekly podcast from the web, like Working Lunch from the BBC? And how about the news features that play in RealPlayer: Can I download them, too?


    Dear Audrey,
    If you want to download audio files to use offline, then the mp3 podcast format is what you want. These files were designed to be played offline on the iPod or other players. Unfortunately, the streamed audio files used by news sites only play online (viz. "Working Lunch"). You can listen or watch online, but you can't take that file with you.

    However, if you want to tinker with "ripping" (=rerecording files into a new file or file format) streamed audio files, you might try the VLC media converter (http://www.videolan.org/vlc) or Zamzar, an online converter (http://www.zamzar.com). You can also use recording software such as Audacity (http://audacity.sourceforge.net) to rerecord the online file while it plays. I didn't find a way to save the audio, let alone the video for "Working Lunch" to my computer, though. Have any of you tried to do this with success? If so, please send us your tips. Until then, there are plenty of podcasts ready to go.

    We asked around at a recent MELTA Business English workshop, and the participants volunteered their favorite podcasts:

    BBC Radio 4 (Gillian, Timea and Lisa)
    onestopenglish (Gillian, Rosemary and Dianne)
    Business Spotlight podcast (Joan and Dianne)
    BBC 6-minute English (Marion)
    BNET.com Useful Commute (Susan)
    Guardian Weekly (Fran)
    NPR: 7AM ET News Summary Podcast (Frank)
    NPR: Car Talk's Call of the Week Podcast (Frank)
    TED Talks (Anne)
    The NYT Ethicist (Joan)
    The Street (Brian)

    Getting started with podcasts: From feed to desktop to player

    One way to get individual episodes from a podcast series is to follow the RSS feed button (orange square). RSS (Really Simple Syndication) software organizes online sources of information for you. Clicking on the button takes you to the page containing the episode description(s) and the audio file name(s) ending in "mp3". Copy the audio file you want onto your computer. On a PC/Microsoft, right click your mouse and select "save as". On a Mac "right-click" using "control" and your mouse, or drag and drop the file onto your desktop.


    If you want to get a podcast regularly, subscribe to it. Download iTunes for free (from http://www.apple.com/de/itunes). Then either
    1. Open iTunes, click on Advanced and you'll see the option "Subscribe to podcast". Click on that and paste the feed link to the podcast you have selected (ending in "/rss.xml") into the box. Then click on "OK".
    2. OR go online to the iTunes Store (the button is on the left sidebar in iTunes.) You will see "Podcasts" on the top right. Under that is "Kartegorien". Click on "Bildung" and, on the right, click on "Alle anzeigen". Browse, scroll down, select what you want and click on "Abonnieren" next to your selection(s).
    The latest episode of the podcasts you subscribe to will automatically load whenever you press "refresh" in your podcast directory. When you subscribe, the whole archive becomes available. To download an old, archived episode you must click on the "get episode" button. Podcasts are free, but to browse the archive or download transcripts, you may have to become a premium member. This is often free, especially if you subscribe to the print publication (e.g. Business Spotlight or Spotlight); just register on the publication's website.
    Save the mp3s you want to listen to onto your mp3 player using your player software. Every player is a bit different.

    Sunday, 5 April 2009

    Do you miss watching TV from back home?

    I'm British, so it would be possible to install a satellite dish on the roof of the block of flats I live in and be able to watch British TV, but if you come from the USA or Australia that is not an option.

    Have you tried watching your favourite TV stations from back home via the PC though?

    The quality certainly isn't as good as HDTV, but it's not that bad.

    This site is a good place to get started wwiTV.com. It has links to literally thousands of TV stations around the world, but quite a few of those links don't seem to work, or at least they don't work on my PC, perhaps you will have more luck. However, it let's me watch the BBC's Newsnight as well as other BBC programmes, so I'm a relatively happy bunny - especially as I don't have to pay a licence fee to watch them!

    If you want to find out more about watching TV online, check out this site which lists 33 ways to watch free TV online.

    Spam, spam, spam

    You may remember Monty Python's SPAM song...

    "SPAM, SPAM, SPAM, SPAM... lovely SPAM, wonderful SPAM"

    The SPAM song was made shortly before spam or spamming on the Internet had really begun, but if you're unlucky, Monty Python's SPAM song may sound a bit like the contents of your inbox.

    Btw, SPAM in uppercase letters is a strange kind of British luncheon meat which looks and tastes a bit like the even odder looking and tasting Leberkäs. Spam in lowercase letters normally means unsolicited emails.

    Is there anything you can do to reduce the amount of spam you receive?

    Well, your Internet provider probably provides a spam filter for 'free' and there are dozens and dozens of spam programs out there that you can download, some of which are also free, but the better spam filters usually cost a little.

    If you are interested in downloading a spam filter, it is best to read some reviews about the program you want to download first, otherwise you may find that the program not only deletes spam, but perfectly legitimate emails that have been sent to multiple recipients.

    One thing to avoid, regardless of which spam filter you use, is the setting 'automatically delete spam'. Spam filters cannot always be relied on to identify spam correctly, so it is best to tell the spam filter to send suspected spam to your junk mail or spam folder so you can check the contents of the folder for legitimate emails later.

    Finally, don't forward spam that you have received, otherwise there is a very real danger that you may end up being blacklisted as a spammer yourself.

    You may say that you would never forward spam, but I'm afraid a friend of mine forwarded a harmless, but stupid chain letter. My spam filter identified it as spam and all her subsequent emails went into my junk mail folder until I fiddled around and managed to add her email address to my safe senders' list.

    Saturday, 4 April 2009

    What kind of tech user are you?

    The Pew Research Center says it's a "fact tank", dedicated to research on issues, attitudes and trends shaping America and the world. One of its projects, the Pew Internet & American Life Project, explores the impact of the internet on children, families, communities, the work place, schools, health care and civic/political life. They've developed a user typology and statistics based on the results of a quiz. If you're interested in thinking about how you use the internet, and if you want to ask your students about their habits and needs in order to assess your digital communication style, this quiz is a good place to start.

    My feedback said: "For you, the digital commons can be a camp, a lab, or a theater group – places to gather with others to develop something new." That might be true. But what if my students don't use the internet that way? - Do the test and let us know what you find out about yourself and your students.

    Tip found on a blog called IamLibrarian

    Friday, 3 April 2009

    Converting your old cassettes to MP3 files

    If you are like me, you will have a collection of ancient records, cassetttes, CDs and now MP3 files.

    A while back I decided it was high time to get all my audio recordings into one format, namely MP3.

    OK, but how do you do that? That's a good question, but converting an analogue audio signal to a digital one isn't as difficult as I'd first thought.

    What you need is:

  • a cassette recorder
  • a computer with a sound card
  • a cable to connect the cassette recorder to your sound card
  • a free program like Audacity which can be used to record and edit sound.
  • Plug the cable into the 'Line out' socket of your cassette recorder and stick the other end into the 'Line in' socket on your PC's sound card.

    Open Audacity and select the input type 'Line in'. This tells Audacity to record from the 'Line in' socket on the sound card. To do this, open the 'Edit' menu and then select 'Preferences'. A new screen appears - click on the "Device" selector to chose your input (in this case, soundcard) and change the "Channels" selector mono or stereo recording as appropraite.

    Next click on the red record button in Audacity and press the play button on your cassette recorder.

    After you have recorded the cassette or the tracks you wanted to record, press the yellow stop button on Audacity.

    Easy, wasn't it?

    Now all you have to do is convert your file to an MP3 format. To do that, go to the 'File' menu and select 'Export as MP3'.

    The MP3 file you have saved to your computer can also be converted to WAV file and burned to a CD.

    Thursday, 2 April 2009

    Making animated films with your students

    Want to have students create dialogues and watch them being played by animated characters with funny robot voices? Your students and you can make an animated movie online for free by going to www.xtranormal.com. Here is a sample, made just for teachers :)


    Tweeted by Graham Stanley

    Wednesday, 1 April 2009

    Do you back up your files often enough?

    If you have ever lost your hard disk, you will know how horrible it is to lose some or possibly, but hopefully not, all of your files.

    Most people back up their files on the hard disks on external hard disks, but unfortunately a lot of people are also like me and forget to do it as regularly as they should.

    One solution for lazy and/or forgetful people like me is to back up your files online.

    If you do a search for online backup providers you will find dozens of them. The one I use is called Mozy and it is really simple to use and relatively cheap - click here for a comparison of some of the better known backup providers.

    I don't have to think or mess around with anything; the backups are done every day as long as my PC switched on is on and has an Internet connection.

    The program just backs up new files or files that have changed since the last backup (known as an incremental backup).

    A word of warning though, the first backup you do can take days and days... and a few more days because the backup program has to upload all your files first! Once it's finished though the increment backups usually only take a few minutes.

    Fortunately, hard disks don't often go phut, but the last time mine did I was in the middle of writing a book and I probably would have lost several weeks' work because, as I've already mentioned, I'm not too good at backing up my files on the external hard disk I have. Luckily, I only lost a few hours work and was able to restore the units I'd written from the remote server where my files were stored.